
If you’re interested in mountain biking but not sure where to start then this is the guide for you! From bikes to gear, to riding friends, and more, I’ll be getting into all of the nitty-gritty details.
While it may seem like there’s a lot to learn when you first begin, know that it’s well worth your time. Not only is mountain biking a fun way to exercise, but it’s also a great way to enjoy and explore the outdoors. The mountain biking community is incredibly welcoming and helpful, so don’t be afraid to ask questions!
The basic steps for getting started in mountain biking include:
- Get access to a mountain bike
- Find some riding buddies
- Purchase the basic safety gear
- Practice basic bike skills before getting on the trail
- Prep for your rides
With that, let’s jump into how to get started in mountain biking.
How to get access to a mountain bike
While you can certainly go out and buy a bike right away, it’s not a requirement for getting started in mountain biking. If you have a friend who’s already into mountain biking, you can ask them if you could borrow a bike for them and join them on a few rides.
Many experienced riders keep their older bikes and will be more than willing to let you use it to hit the trails with them.
If you don’t have friends already into mountain biking then you’re not out of luck! Many local bike shops have rental or demo bikes available that you can use while first getting into riding.
This is a perfect opportunity to establish a relationship with them, while also getting a feel for what type of bike best suits you.
They can help you find a properly sized bike that has been fitted to your measurements. Ideally, you can try out a couple of different bikes to see what you like before actually purchasing one.
REI is another great option for getting access to demo bikes and people who can make knowledgeable recommendations for your first purchase.
When it does come time to buy, don’t worry about getting a high-end mountain bike. Sure, if money isn’t an issue then, by all means, go for that $5,000 mountain bike if you want it. However, most of us have financial constraints to work around.
While there are certainly cheaper bikes, the $1,000 mark seems to be a good entry point. It allows you to get a quality bike with pretty darn good components. This ensures that it lasts longer and requires fewer future upgrades i.e. money spent on the bike.
While there are certainly cheaper bikes out there, they end up being around the same price once you account for replacing broken parts or upgrading components.
You can also look into buying a used bike. Mountain bikes lose a huge portion of their value in the first year so you can find some awesome discounts on used bikes.
Look to buy them from a trusted source, or have a knowledgeable friend come along to inspect for any major issues before purchasing a used mountain bike.
If you’re interested to learn more about the specifics of mountain bike depreciation, feel free to take a look at the in-depth article that I wrote on the topic here. I also have another article explaining the best places to buy a mountain bike online if you go that route as well.
Find some riding buddies!
You’ve got the bike, you’ve got the gear, now what? Time to find some friends to ride with! Sure, nothing’s stopping you from hitting the trail solo but riding with friends when just getting started is a much better idea.
Not only is riding with friends more enjoyable, but they can be a huge help. From showing you tips and tricks to helping patch you first couple friends they are such a big help. They usually have good knowledge of the local trails and can help guide you through beginner-appropriate trails while your skills improve.
These riders usually also have all of the basic maintenance tools on hand in the event you need to do some basic repairs to your mountain bike. Here’s my list of the 9 essential tools if you’re looking for a place to start.
Asking to ride with existing friends is the easiest option, but it’s certainly not the only one. Many communities have local mountain bike groups that are very welcoming of beginners.
You can out about these are your local bike shops, ask to join ride groups at REI, or by checking social media like Facebook.
In most cases, I think people are simply too shy when it comes to asking if they can ride with friends. Perhaps you’re also afraid that you will be too “bad” to ride with them.
Mountain biking is a very welcoming community, and most riders are willing and want to help bring new people to the sport. So don’t be afraid to ask!
Remember, we all started out as mountain biking newbs at one point! 😉
Mountain biking gear
While the bike is clearly the most important item, there are just a couple other items that you’ll want to look into when getting started. Most of these are safety-related options to protect you from injury while you’re out having fun.
While there are TONS of mountain biking accessories out there, those are not things that you need right away. Start with the basics I’m describing below and worry about getting the other assorted items later.
Helmet
The first and most important piece of gear is a helmet. You’ve only got one brain, so you better protect it!
Falling off a mountain bike and banging your head is just asking for a concussion or other head injury, so riding without a helmet is borderline insanity in my opinion. If you feel pretty certain that you’ll be sticking with mountain biking, it makes sense to just go ahead and buy a good helmet.
The best bang-for-your-buck helmet that I’ve come across is the Giro Chronicle MIPS helmet. It’s light, comfortable, and has many of the same features as helmets that cost twice as much. You can learn more about it in my article here.
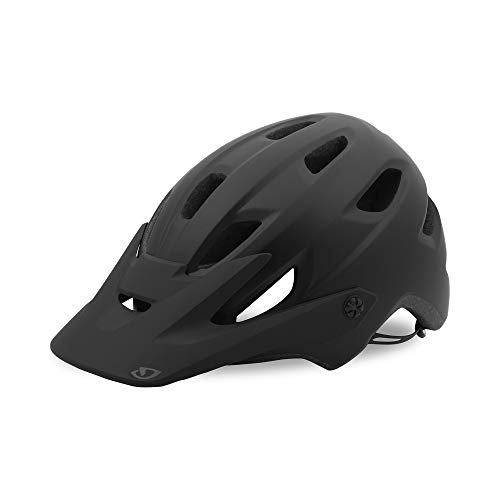
The Chronicle MIPS provides the essential trail performance and protective capability you need in an affordable package that doesn't skimp on style!
If you don’t want to purchase a helmet right away, then you can also try borrowing one from a friend or renting one from a bike shop. Just make sure that the helmet properly fits your head to ensure that it’s able to provide the maximum protection.
In the event that you’re torn choosing between a full face or open face helmet, my article here may help with your decision 😉
Note: If you’ve got an old helmet lying around, you may want to think twice before using it. Like any piece of gear, helmets need to be replaced to! To learn more about how to tell when a helmet needs to be replaced, take a look at my article here.
Padded Shorts
For comfort in the saddle, I can’t recommend enough that you get padded shorts. These can be had in a pair of mountain biking shorts that come with a padded liner, or a set of padded underwear that you would wear underneath regular shorts. Trust me – your bum will thank you!
Don’t worry about breaking the bank up front, just get a decent pair to use for now and you can invest in better ones later. Below are links to affordable pairs of each type.
For ease of use, I’d recommend buying a dedicated pair of shorts with an integrated liner. My favorite pair of shorts is the

Whether it's a day of aggressive singletrack or a casual trail ride, the Fox Ranger Cargo Shorts meet all your off-road demands. Resilient 2-way stretch shell moves with you for enhanced pedaling efficiency while the detachable liner and high-density EVO chamois provides comfort over rough terrain. Adjustable hem lets you determine the fit and ample pockets lets you have your essentials within easy reach.
If you’d rather use an existing pair of athletic shorts and just purchase a standalone liner, then the Baleaf Padded underwear is a good entry pair that I recommend. Click here for the Baleaf Padded Underwear Shorts on Amazon.com.
Shoes
If you’re just starting out with mountain biking then I’m going to assume that you’re riding flat platform pedals and not a clip-in style. Unless you’re coming from a road cycling background, most new rider’s feel far more comfortable with flat pedals. The other benefit of flats is that they don’t require you to get a new shoe.
While a mountain biking-specific shoe will absolutely offer more grip and foot protection, it’s not a requirement for getting started. I’d rather see people invest in a few safety-related items first before getting shoes. However, if budget is not an option then definitely feel free to go for it!
Ask around about mountain biking shoes and the one name you’ll always hear is Five Ten. They’ve made great shoes for a long time and are another can’t miss selection. Click here to learn more about the Five Ten Freerider Contact shoes.
Still wondering if mountain bike shoes are worth it? If so, take a look at my full article on this topic here.
Gloves & Kneeguards
While not required, I’d also recommend getting a pair of gloves and knee guards when you start mountain biking. Gloves enhance your grip and allow you to ride more safely.
While both gloves and
Giro products are ubiquitous and their gloves are no different. They’re moisture-wicking to keep the sweat at bay and have 4-way stretch fabric for comfort. While there are plenty of good gloves out there, you can’t go wrong with this pair. Click here to learn more details about the gloves that I most recommend, the Giro DND.
It used to be that only downhill riders wore
My quick pick would be to just go with a pedal-friendly pair like the Alpinestars Paragon Knee Guard for their fantastic value and comfort. You can always upgrade to something more advanced later on. Click here to see the Alpinestars Paragon on Amazon.com.
Practice before hitting the trail
Now that you’ve got a bike and the basic safety gear, it’s time to practice. However, that doesn’t mean you have to wait for the trail to practice!
In fact, it’s better to work on the riding basics before you’re flying down a hill or whipping through a turn.
Practicing simple bike skills such as:
- Stopping, starting, and dismounting
- Shifting up and down through your gears while riding
- Riding while standing up on your pedals instead of remaining seated
- Placing small rocks on the ground and riding figure 8’s through them to work on tight turning
- Jumping curbs or riding over other small bumpy obstacles
- Riding your bike off small obstacles to practice landing. These don’t need to be actual jumps. Just enough so you get a tiny bit of airtime 🙂
- Smoothly applying your front and rear brakes together. Avoid locking up the front brake alone unless you’re interested in a face plant!
- Balancing on the bike while the front and rear brakes are locked in. Learning to balance is especially useful for navigating tight switchback turns.
While these are all small skills, it’s much better to practice them when you’re not under duress on the trail. Trying to enact one for the first time while bombing downhill probably isn’t going to end well!
As with learning any new skill it does take and practice. It’s much better to spend a little time every day practicing these skills for a short period, then only being able to practice them once every two weeks.
Keep in mind that you don’t need to feel comfortable with every single skill before jumping on a trail. Just make sure to start out on easy trails and slowly try harder ones as you advance.
If you have ever skied before, you know that you would never hit a double black diamond on your first few runs. You start with the greens and build up your confidence!
Once these start to feel less challenging you try some easy blues and continue to level up your skills. This process of building up your skills and confidence is exactly the same as mountain biking!
For more examples of places and situations that you ride your mountain bike, make sure to take a look at my article here as well.
Prepare for your rides
- Research before you ride – Take some before heading to the trail to get an understanding of the trail system for that respective park. Look for beginner trails, and try to plan out which ones you want to ride. If you can, print out a simple map of the trails or download them to your phone before heading out on the trail. Getting lost on the trail is never fun!
- Tell someone where you’re going – Even when you’re going riding with friends, it’s smart to tell someone at home where and when you’re going riding. In the event that something does happen, someone will at least have an idea of where to begin looking.
- Check the weather – While it may be a beautiful cloudless day right now you have no idea who weather conditions could change. Spending just a couple minutes checking the weather before heading out on a ride could save you from being caught on the trail by an unexpected rain or lightning storm.
- Dress accordingly – Checking the weather is not only helpful for preventing you from being surprised by a storm but it also gives you a better idea of how to dress. If it’s going to be sweltering hot or cold and windy, you’ll want to adjust your clothing choices accordingly.
- Bring water and snacks – Mom was right, you need your fluids and snacks! I can’t understate the importance of hydration on the trail. Make sure to bring along a water bottle or hydration pack for your ride. Small snacks are also helpful in the event you get hungry or need a little jolt of energy to make the final push back to your vehicle.
Additional Common Questions from Beginners
Should I start mountain biking? To be honest, this is completely up to you. Assuming that you’re healthy enough to mountain bike and are interested in it, then I see no reason why shouldn’t! It’s a really fun way to spend time outdoors that acts to get in a good workout and relieve stress. That’s at least a “three birds with one stone” situation 🙂
Is mountain biking hard? Here comes everyone’s least favorite answer to a question – it depends. If you have a history of road cycling or motocross then you may take to it without too much trouble. If this is your first time riding a bike then it’s going to require a lot more work. In my opinion, regardless of which end of the spectrum you fall onto it’s going to be worth it in the end!
How do I make my seat more comfortable? If you ignored my previous recommendation to get a pair of padded shorts, then that’s the first place you should start! If you already have padded shorts and it’s still uncomfortable then it could be an issue related to the seat fit. The good news for you is that I wrote an entire article on the best ways to make a mountain bike seat more comfortable.