
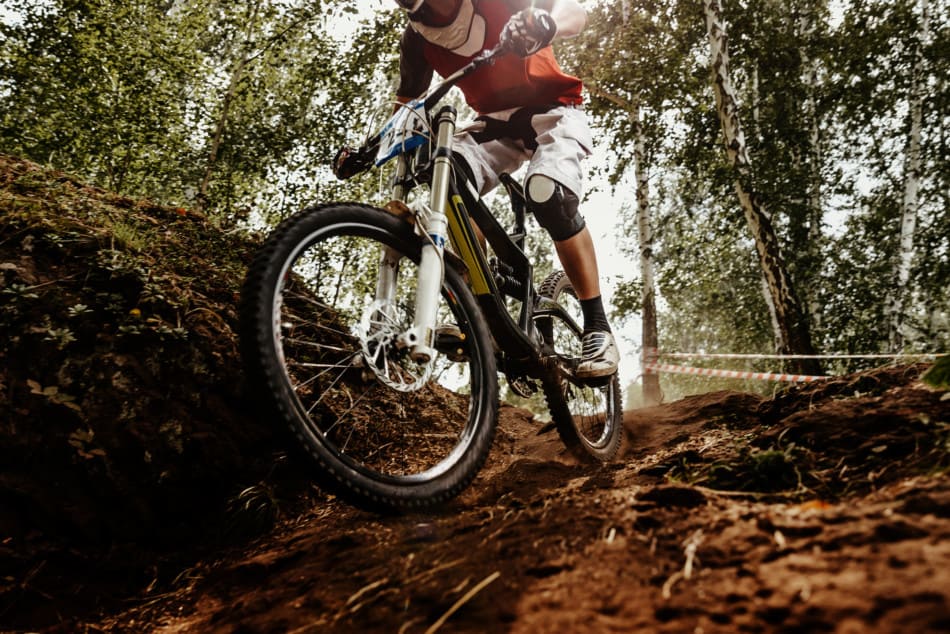
Whether you’re into racing or simply have a need for speed, everyone wants to go faster in mountain biking!
Here are 13 tips and tricks that you can use to help get the most out of your mountain bike and make it go faster.
#1 Tire selection
When it comes to going faster in mountain biking, one of the first places that I’d recommend taking a look at is your tires. Specifically, the tread on your tires.
Compared to road or hybrid bikes, mountain bikes have wider tires with much more aggressive tread. While this tread is incredibly helpful for maximizing your traction, too much tread could also be slowing you down.
Many beginners start off with pretty aggressive tires so that they have maximum traction when first getting into mountain biking. These aggressive tires help them build confidence so that they don’t have to worry about sliding out while learning their new skills.
However, once they’ve pushed past the beginner phases and are trying to eke out every ounce of speed, it may be time for a less aggressive tread. Keep in mind you that you don’t necessarily need a narrower tire, just one with a little less tread.
That width is still important for creating enough surface area to stay in contact with the ground!
Consider looking into tires that have smaller knobs with closer spacing. Really aggressive tire tread usually has large square knobs that are widely spaced.
This type of design creates the most traction, but also slows you down the most. This is a result of the increased friction i.e. rolling resistance with the ground.
Clearly, there is a fine line between going with too little or too much tread. You still want to ensure that you’ve got enough traction while allowing yourself to roll more efficiently.
In particular, if you find yourself spending more time doing cross-country rides, then you’ll really benefit from an XC-oriented tread with less rolling resistance. I put together recommendations for a few tires to consider looking at here that may be just what you’re looking for.
#2 Optimize your tire pressure
While I’m on the topic of tires – tire pressure is another critical element for maximizing your riding efficiency. Similar to the concept with tread, tire pressure plays a role in how much contact the tire makes with the ground.
More contact is a result of lower air pressure. When the tire’s not optimally inflated, it spreads out and creates more surface area that contacts the ground. While this can be great for increasing traction, it can also slow you down. Once again, we’re running into that ole bugger which is increased rolling resistance.
Before each ride, make sure to check that your tire pressure is at the right setting. If you’re not sure what the correct pressure is, you can take a look at your tire’s sidewall. The manufacturer typically lists a recommended pressure there.
Keep in mind that the manufacturer listed pressure is just a general recommendation. You should still test out a few slightly different tire pressures to see which one works best for you. The trail terrain in which you ride, your weight, and riding style can all play a factor in the optimal tire pressure for you.
Somewhere in the range of 25 – 35 psi is a good range to start. When doing your tests, try out pressures as little as one psi difference to really fine-tune the perfect setting. While it may not sound like a lot, these slight changes in pressure can make a big difference.
Always carry a decent mini or
#3 Switch to a tubeless setup
I’ve got one final tip when it comes to optimizing your tires for speed! While they’ve gotten very popular in recent years, not everyone is using a tubeless setup on their mountain bike at this point. This is unfortunate because they’re missing out on the joy of having to repair fewer flats!
While spending less time fixing flats isn’t the ONLY speed-related reason to switch, it’s certainly still a good one 😉
In addition to fewer flats, a tubeless tire setup can also help you ride faster! Because the overall tire weight is lighter without the tube, it’s able to rotate more easily. This lowered rotational resistance allows you to accelerate more quickly in preparation for a climb, bank, etc…
In my opinion, the reduced number of flats alone is worth the switch. But if you’re wanting to also go faster and have not yet converted to tubeless, that’s just one more reason to make it now!
#4 Replace your flat pedals with clipless ones
Yea, I know… this one seems obvious if you’re an MTB veteran! But if you’re new(er) to mountain biking than there’s a good chance that you’re still using flat pedals. Unless you came over from road biking, most new rider’s are not comfortable being clipped into the bike.
Clipless pedals allow you to get a more powerful and consistent stroke. More power = more distance traveled = faster. For downhiller’s the stroke efficiency may not matter as much since there’s less pedaling but it’s still value from a foot security standpoint.
Clipless pedals physically help your foot stay in place instead of slipping or popping off. This extra foot security ensures that you’re able to maintain better balance and apply power to the pedals when needed. Maximizing your control of the bike will help ensure smooth fast lines during your ride. In keeping with a partial adage from the Navy SEALs – “smooth is fast”.
However, don’t just throw out your flat pedals if you do make the switch. They’re still great to ride with occasionally to hone your riding technique. Since your foot is not physically connected to the bike with flats, it forces you to find the best positioning and not rely on being connected. So, definitely worth holding onto them.
While I don’t want to get into the weight argument just yet, there are some INSANELY light clipless pedals being manufactured today. This could be a chance for you to both get a more efficient pedal and shave off some weight. You can take a look at this article that I put together that goes into the detail of the lightest mountain bike pedals on the market.
#5 Lubricate your drivetrain
Since I’ve been literally working from the ground up with my tips and tricks, I’ll continue that trend with moving on to the drivetrain. Have you ever heard the saying “runs like a well-oiled machine”? Well, it’s around for a reason!
A well-lubricated drivetrain will allow it to function more efficiently. Lubricants allow the parts to pass by each other with less friction. Every bit of energy saved from friction is instead translated into the wheels allowing you to travel further.
In addition to allowing the drivetrain to operate more smoothly, you will also be sparing it from some wear and tear. Friction is the enemy of both speed and the lifetime of your drivetrain! Make sure to keep your chain, chainring, rear cassette, and derailleurs well lubricated to ensure that they operate smoothly.
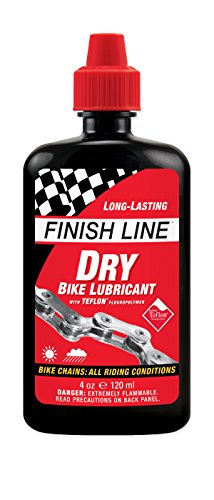
Another note on drivetrain lubrication is to use an appropriate lubricant for your riding conditions. For wet conditions, make sure to use a wet lube as it will last longer and do a superior job. On the flip side, make sure to use dry lubes for dryer environments.
They cause less gunk to accumulate compared to wet lubes and will allow the drivetrain to operate more efficiently. If you don’t already have a good lube, take a look at a dry and wet lubricant that I recommend here.
-
 Check Current Price
Tri-Flow products Get You Movin' with triple action cleaning, protecting and lubricating to maximize your performance. This formula combines advanced ingredients with ideal application methods to combat your enemies on the road, trail or track - moisture, corrosion and metal-to-metal friction.
-
 Check Current Price
Finish Line's Dry Lube goes on wet and sets up with a dry 'wax-like' synthetic film that helps keep your chain clean by not absorbing excessive amounts grit, grime, or dust. Thanks to the added Teflon fluoropolymer, Finish Line's Dry Lube minimizes pedaling friction, repels moisture, and withstands rides up to 100 miles.
Just don’t go crazy with oiling your bike. There is a thing as too much lubrication. You don’t want it slinging around over your brakes and other components.
#6 Replace your chain
In the process of lubricating your drivetrain, you may very well notice that your chain has stretched. This is very easy to tell using a quick and handy chain checker tool if you don’t already have one. (Here’s a link to a fantastic one that I recommend with more information about it.)
Chain stretch occurs as the components wear down and allow it to elongate. This is simply part of normal wear and tear from use. If your bike has eleven or more sprockets in the rear cassette, then you’ll need to replace the chain once it has stretched 0.5%. Bikes with ten or fewer gears can wait until it has stretched 0.75%.
A stretched chain will slow you down for two reasons. First, every time you drop a chain you’re going to have to stop and fix it. If you’re concerned about speed and time this will be precious seconds and effort that are needlessly lost.
Secondarily, a stretched chain just doesn’t transfer power to the wheels as efficiently. Every time your legs start to drive the cranks they’ll have to take up the slack from the stretch before they start turning the rear wheel. While this may sound like a minor aspect, we’re talking about trying to gain speed and efficiency by making small improvements all over the bike. This is clearly one area that will cost you those when neglected.
On the upside, chains a relatively cheap mountain bike component. Not only does riding on a fresh chain feel AMAZING, but it also spares the rest of your drivetrain from unnecessary wear and tear. Those components are typically more expensive, so it makes sense to error on the side of caution when it comes to replacing your chain.
#7 Optimize your shifting
With a fresh and well-oiled chain, you will also want to ensure that your derailleur(s) and cable tension are properly configured to allow for smooth shifting. Because many modern mountain bikes use single front chainrings, many of us only have to worry about adjusting a rear derailleur.
Even if you do have a front derailleur, it always seems that the rear is the more likely one to get knocked out of alignment.
A bike that shifts smoothly will allow for more efficient riding and power delivery. You also won’t have to worry as much about dropping a chain because it’s able to quickly jump to and from your highest or lowest gears while riding.
Use the H and L limit screws on the derailleur to begin making the adjustments. As you might have guessed, “H” is short for high and “L” is short for low. This means that the H limit screw adjusts the derailleurs travel around the highest gear, while the L limit screw adjusts its travel nears the lowest gear.
Before you start making any adjustments to the limit screws, double check that the rear derailleur hanger is not bent from a previous crash. The hanger should be aligned to allow the derailleur to hang vertically. It will be much harder to get the alignment properly set using the limit screws if the derailleur is out of position to begin with.
Once you’ve gone through the limit screw adjustment process, you’ll need to use the barrel adjusters to tweak the cable tension. A proper cable tension allows the chain to smoothly move up and down the gears with quick shifts. You’ll know that it’s not correct when the chain struggles to travel up or down during shifts.
If the chain isn’t moving up, you need to tighten the barrel adjuster. Use half-turns until it’s able to jump smoothly upwards. If the chain refuses to move down during shifts, there is too much tension and it needs to be loosened.
If this entire process is new to you, then I’d recommend watching the below video from Park Tool. It walks you step-by-step through the entire process.
#8 Swap out your cassette
Even with a fresh chain and properly adjusted gears, you’re just not going to get good performance on the bike with a worn out cassette. Most riders get a 1,000 miles of use out of a mountain bike cassette.
However, you may get more or less depending on your riding style. A good rule of thumb is that a cassette should last through two to three chains on the bike before needing to be replaced.
Aside from poor shifting performance, you can tell that the cassette is worn when the sprocket teeth start looking like a shark fin. Instead of a symmetrical triangle appearance, one edge will be worn in towards the middle creating an inward curve.
You may find that not all of the sprockets are worn, but just the most heavily used gears. This is common since we spend most of our time in them, and they get more wear and tear. While you could probably find replacements for just those couple sprockets, in most cases it’s more cost and time effective to replace the whole cassette.
If the teeth don’t have this worn appearance than you can move on. If it does appear to be worn, you can follow the instructions for replacing a cassette in my article here.
#9 Align your brakes
With all of the potential drivetrain inefficiencies cleaned up, it’s now time to consider your brakes. The importance of breaks is pretty obvious. They slow you down and keep you from riding off the edge of the mountain! What you don’t want is them slowing you down when you don’t need them to.
The key is to make sure that your brakes are not rubbing when they’re not engaged. Virtually all mountain bikes these days use disc brakes. All it takes is a little bend to the brake rotor for it to rub against the pads even when the brakes are not engaged. It some cases you can tell that the rotor disk is rubbing just by the sound of it.
In other situations, you’ll need to look down into the caliper and watch the rotor. With the rear wheel elevated, give the wheel a spin and look down at the caliper. With even the smallest bend, the rotor will appear to have a slight wobble while it’s spinning. While a little bit of bend is ok, it becomes a problem once the rotor starts rubbing against the brake pads.
For these situations, you’ll need to use a disc brake tool, wrench, or possibly even your hand to gently bend it back into position until it’s no longer rubbing against the brake pads. Make tiny adjustments at a time instead of trying to get it fixed with one big pull. If the rotor is in really bad shape, you may even need to replace it.
Once you’ve fixed a bent rotor or verified that it’s not the source of the rubbing then you’ll want to also check that the calipers are centered. While looking downward at the caliper, there should be an equal amount of space on either side of the rotor. It could be that the caliper was knocked to one side and that is the source of the rubbing.
#10 Tune your suspension
Finding the perfect suspension setup is a tradeoff between comfort and performance. Suspensions that are configured to be too soft will eat up energy and result in slower runs.
While ones that are too hard may kick you around the trail so much that it’s nearly impossible to keep an optimal line. It all comes down to finding the perfect middle-ground.
High-end bikes have suspension that comes with a variety of settings that will vary, so I’ll focus on the settings that will be generally applicable. Since all mountain bikes have a front suspension, let’s start there.
Adjusting the fork
Sag
To begin adjusting the fork, put on all of the gear that you would normally ride in and head outside with your mountain bike and a shock pump. The first thing that you’ll want to get correctly set is the fork’s sag.
Start by sliding the 0-ring on the fork all the way down, then hop on your bike and slowly ride ahead. Carefully stand up in the pedals in a balanced attack position. Do this smoothly and try not to bounce or pump the handlebars. Carefully lean back and then bring the bike to a stop.
Take a look at the o-ring on the fork to see how far it has traveled. A good starting point for most forks is 25% sag. Some forks will have markings to judge this sag percentage, whereas with others you may need to eyeball it or grab a tape measurer.
If your sag was more than 25%, use a shock pump to add additional air and increase its resistance. In the event that it traveled less than 25%, use the shock pump to bleed a little bit of air out. Pump the handlebars a few times to redistribute air inside the shock, then repeat the test. This step optimizes the “spring rate” for your fork.
Progression
The second important component of the fork will be its progression. This is a measure of how much force you can apply to the bike that causes the fork to further compress.
Check the fork’s progression by riding slowly over a flat stretch of ground while standing in the pedals. Bounce and push down as hard as you can to check the travel under the applied force. Ideally, you should be able to get it to 80-90%.
If you exceeded that range or bottomed out the suspension, then you may need to install volume spacers. Remove volume spacers if the travel didn’t reach the proper range.
Rebound dampening
The last element to setup is the rebound dampening. While this sounds fancy, all it really means is how fast the fork returns after being compressed. A fork that returns too slow will create a very bouncy sensation while riding.
The quickest way to set the rebound is to stand next to the bike and load the handlebars so that the fork compress by roughly a third. Abruptly let go of the handlebars so that they quickly spring upward.
The perfect amount of rebound is the point where the wheel almost lifts off the ground.
Adjusting the rear suspension
Sag
For bikes that have a rear suspension i.e. soft tails, you want to start by setting the rear suspension’s sag.
Start by lowering your seat down so that your feet can easily reach the ground. Push the rubber o-ring all the way up against the shock. Sit in the seat and gently lower your weight down. Lift your feet up momentarily so that all of your weight is on the bike. Carefully set your feet back down and stand up.
Due to the compression, the o-ring will have been pushed partially down the tube. Ideally, it will have compressed down by 30%. Some suspensions will have markings on the tube that make the sag easy to judge.
For those that do not have markings, you can make an eyeball estimate to see that the ring is one-third the way down the barrel. You can also choose to grab a tape measure to calculate the exact distance and percentage.
If your sag was more than 30% then you’ll need to add air using a shock pump to increase its resistance. On the flip side, if it traveled less than 30% you will need to release a little bit of air. Re-test the sag using the same previous approach until you get it right.
Progression
Use the same bounce test as was previously done with the front suspension to gauge the shock’s progression. It should have approximately 90% travel.
Consider adding volume spacers to the shock if you were able to bottom it out, or remove them if you didn’t get enough travel.
Rebound dampening
Last but not least, let’s check the shock’s rebound dampening. Sit down in your seat and ride off a small drop (curb height is plenty). The perfect amount of dampening will cause the bike to just barely overshoot the sag line. Think of this as a slight overcompensation so that it smoothly returns to equilibrium.
Once your rear suspension is completely configured you’ll want to do a final bouncing ride test to ensure that the front and rear suspensions are balanced in their return rate. It’s ok if the front fork returns slightly faster, but it should not be slower than the rear shock.
#11 Perfect your saddle position
Setting your saddle to the perfect height and position can make a huge difference in pedaling efficiency. While it may seem small, the difference of a few centimeters can have a huge impact. For saddle height, your heel should just be able to reach the pedal when it’s in the down position and your leg is completely straight.
This should ensure that when you’re actually pedaling with a normal foot placement there is a slight bend in the knee at the bottom of your stroke. While many mountain bikers are using dropper posts to quickly lower their seats for big descents, setting the proper top height is still important.
Saddle tilt and forward to back positioning are also important factors to consider. However, I cover them more thoroughly in my article about making your seat more comfortable.
#12 Clean your bike ya filthy animal!
While we’ve spent all this time adjusting and replacing components on your mountain bike, there’s one glaring step that has been left out. You need to clean your bike to get it to run the fastest and most efficiently!
Mud, dirt, gunk, and grime, will work their way into every crevice of your bike from rides. And no amount of lubrication will prevent them from robbing you of speed. Check out my article on how to deep clean your bike post-ride for more details.
At a bare minimum, use some hot water and soap to wash away the worst of the grime. In particular, the drivetrain tends to be the messiest part of a bike.
It should be scrubbed with brushes and potentially a degreaser to get it running smoothly again. This includes the chain, front chainring, cassette, and derailleurs.
Take a look at my dedicated article on how to clean a mountain bike chain if this is a new concept for you.
#13 Create a more aerodynamic profile
With a clean and fully optimized bike, there’s one thing left to do! Optimize your aerodynamic profile. By wearing tighter fitting clothing you can lower your wind resistance and speed up runs. Road racers live in fitted gear for a good reason.
You can also consider lowering your handlebars and narrowing your grip to create a more tucked position. This once again lowers your drag so that you’re riding as efficiently as possible.
Consider removing any unnecessary components from the bike as well as they add both wind resistance and needless weight. Common examples would be water bottle holders, pouches, and lights.