
You would think that choosing the right set of mountain bike tires would be an easy choice but can be a surprisingly tough decision! There are so many factors to consider to ensure that you’re picking the right set of mountain bike tires for you.
So, which factors are the most important for picking the right mountain bike tires?
While there are many options, the most important ones to consider when selecting mountain bike tires are where you ride, how you ride, and your type of bike. These answers will impact your decisions for a specific tire diameter, width, and tread pattern.
The answers to these questions will help steer you in the right direction for selecting the correct set of mountain bike tires. Some of the most important tire features include tire diameter, width, tread, a tube versus tubeless setup, and many more.
Understanding Mountain Bike Tire Specs
Before jumping into the simple quiz for selecting a pair of mountain bike tires, it’s important to understand what the various tire features are and how they will impact your ride on the trail.
Mountain Bike Tire Diameter
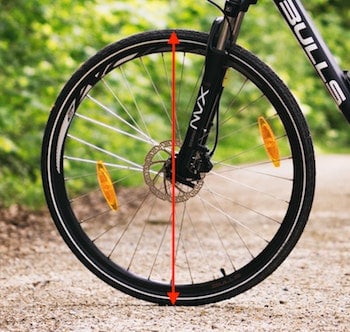
The first place to begin any search for a new set of tires starts with diameter. Tire diameter is the equivalent of its height, as passing in a straight line through its center (as pictured).
You may also hear to it referred to simply as wheel size.
Mountain bike tires come in three diameter options – 26, 27.5, and 29 inches. The 26-inch variety has been the industry standard for a long time, but many modern adult bikes now use 27.5 or 29-inch tires.
Your bike’s frame was engineered with a specific tire size in mind, so while in certain cases it may be physically possible to use a different wheel size it’s probably not the best choice.
For example, if your mountain bike is a 29er, then stick to using 29-inch tires. If you’re currently riding a mountain bike that uses 26-inch tires and want to use bigger ones, then you will be better off upgrading your entire bike to one that’s designed for a larger tire size.
Why does tire diameter matter?
In general, smaller wheels (26″) are more nimble and allow for faster acceleration. However, they have a higher rolling resistance and aren’t as good at going over obstacles.
By comparison, large tires (29″) will keep their momentum better once up to speed and are beasts for rolling over obstacles like rocks and logs! However, their larger size makes them slightly less maneuverable.
In an attempt to blend the best of both worlds, 27.5-inch tires exist as a middle ground between 26 and 29-inch tires. You may also hear 27.5-inch tires referred to as “650b”.
Keep in mind that these are general statements about tire diameter. The physical size of a rider as well as their preferred riding terrain have a big impact on the “best” tire diameter for them.
Mountain Bike Tire Width
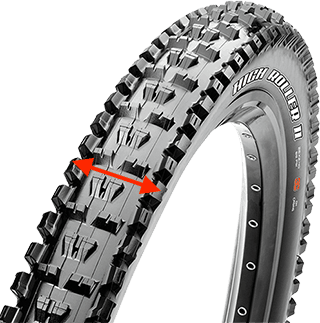
After tire diameter, the next most important consideration will be the tire width. Standard mountain bike tires range from 1.6 inches to 2.6 inches.
This will be the range of tire widths that most mountain bikers use. Tire width is measured from edge to edge at the start of the tread (as pictured).
Tire width is largely a tradeoff between grip and efficiency. Thinner tires create less rolling resistance with the ground and are thus more efficient for long-distance riding.
Their smaller width means that the tire requires less material to make and is also lighter in weight. However, because they have less surface area in contact with the ground they also have less grip.
They also can get bogged down when riding through extremely soft conditions such as sand and snow.
Wider tires create more friction with the ground and as a result, provide more grip! They’re better suited for loose or slippery conditions than slimmer tires and are also better at rolling over obstacles.
However, thanks to their increased grip and size it also means that they are slower rolling and heavier.
The addition of more tire material allows them to be better suited for aggressive riding and increases their puncture resistance. Last but not least, all that extra surface area is also helpful for increasing the tires braking ability.
With these advantages and disadvantages in mind, it makes sense to see how certain tire widths are better suited to particular riding disciplines. Below are some of the common tire width ranges by discipline.
- Cross country: 1.9″ – 2.3″
- Trail / All-Mountain: 2.3″ – 2.5″
- Enduro / Downhill: 2.5″ – 2.6″
Keep in mind that these simply ranges for common tire widths in these disciplines. Trail conditions and a rider’s personal preference still have a heavy influence on selection. For more info about riding on thinner tires, take a look at my dedicated article here.
Naturally, most rider’s don’t exclusively ride one type or the other. That means that you can either pick the one that best fits your most common style of riding, or choose to have multiple tires and swap them out as needed.
Plus and Fat Bike Tire Widths
However, there are also wider models available that fall into the “plus” and “fat” categories. Plus-sized tires fall into the width range of 2.6 – 3.2 inches.
While you could consider a fat bike tire to be anything larger than 3.2 inches, most start at 4-inches and go up from there. The most common fat bike tires run in the 4 to 5-inch range.
Plus tires can be very beginner friendly because they’re easier to ride and more forgiving when going downhill or riding over obstacles. Fat bikes are more often used in specific scenarios like riding on sand or ice.
The increased tire diameter allows the bike to float across the top of these soft surfaces better instead of digging in.
While these may sound like great options for a beginner, not every bike will be compatible with plus sized tires. There needs to be adequate width clearance in the frame and fork to allow the tire to roll smoothly between them, and you current rims may not support tires this wide.
Rather than trying to retrofit a current bike, in most situations it’s easier to simply purchase a plus or fat bike from the start.
Maintain a proper relationship between rim and tire width
Assuming that your bike’s frame and fork can support wider tires, it’s not always as easy as simply purchasing a new pair and slapping them on. The maximum, or minimum, tire width needs to be considered with respect to the rim width as well.
Improperly matching your tires to rims can lead to issues like a loss of stability and protection. For example, rims that are too narrow for their respective tires won’t be able to properly support them.
Leading to a lack of sidewall support, loss of maneuverability in cornering, lowered traction while climbing, and more rolling resistance i.e. less efficient. In contrast, rims that are too wide for their tires will change their shape and lead to issues with traction and control.
As a general rule of thumb, look to match your tire and rim width using the following guidelines shown in the chart below.
| Rim Width [mm] | Tire Width [inch] |
| 21 – 23 | 2.0 – 2.25 |
| 24 – 26 | 2.25 – 2.5 |
| 27 – 30 | 2.35 – 2.8 |
| 30 -35 | 2.5 – 3.0 |
| 35 – 42 | 2.8 – 3.0 |
Mountain Bike Tire Tread
Now that you understand the ins and out of tire size and diameter, it’s time to look at the next most important – tread. In addition to tire width, the tread on a bike plays a crucial role in determining it’s rolling efficiency, grip, and stopping power.
While tread may seem like a simple subject, it’s actually quite the science these days. From knob size, spacing, placement, directionality, etc… there are a lot of options when it comes to tread!
Tread characteristic #1 – Knob Size & Shape
One of the first and most visually obvious components of the tread is its knobs.
The shape, height, and size of knobs all factor into how much grip, braking power, and rolling resistance that it creates with the ground.
In general, smaller and shorter knobs are better for hardpacked surfaces because they provide adequate grip without slowing down the rider.
They minimize the rolling resistance and allow for more efficient travel. However, they also provide less braking power compared to larger, more aggressive knobs.
Medium sized knobs will provide better bite for softer surfaces, while large knobs provide the most traction and are best suited to downhill riders or when trails are extremely slick and/or loose.
Just like the variety of sizes, knobs come in many shapes. From square to round, tapered and ramped, to darts and chevrons they all have an impact on performance.
- Square knobs have more bite compared to rounder knobs but create more rolling resistance.
- Knobs can be tapered so that they’re larger at the bottom than the top. These are perfect for really soft surfaces and prevent the tires from being clogged with dirt and mud.
- Ramping is a directional design that creates less rolling resistance while also increasing the tire’s braking power. It does this by using a smooth shallow front angle to the knob, combined with a steep back angle. This allows for smooth rolling while moving backward but quickly bites into the ground when applying the brakes.
- Darts and chevrons are horizontal pieces that create additional edges for enhanced turning efficiency.
The size and shape of knobs is only part of the equation, so let’s jump into their spacing i.e. pattern to see how it also plays a role.
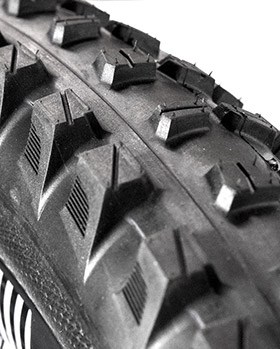
Tread characteristic #2 – Pattern
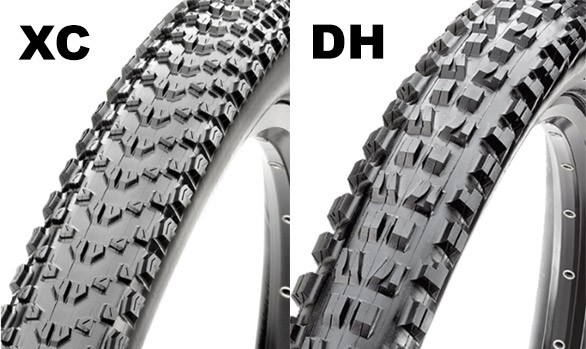
As can be seen in the comparison photo above, there can be a big difference in the tread patterns of tires. The left tire is a cross-country focused one, and in addition to it’s smaller knobs it has a tighter tread pattern.
The lack of spacing between the knobs allows it to glide more smoothly across the ground with less rolling resistance.
The tire on the left is a classic downhill tire that has large knobs and wide spacing. This spacing allows the knobs to bite into the ground and provide more grip.
It also allows the tire to shed loose material like mud instead of it getting stuck and caked into the tire tread.
Tread zones
Aside from the general spacing and distribution of the tread, there are three key zones that tire manufacturers focus the tread around. These key zones are the center, transition, and side.
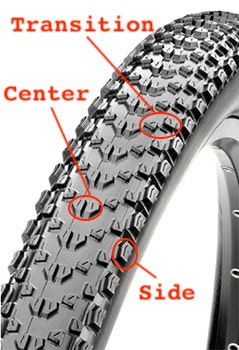
Most of your riding time will be spent engaging the center zone of the tread. This occurs when you’re riding in a generally straight line, with minimal leaning.
Because this area of the tread accounts for a large portion of its surface area, it greatly affects the overall rolling resistance, straight-line traction, and braking power.
Small knobs with close spacing of the tread throughout this zone can help to lower the tire’s rolling resistance but do come at the sacrifice of slightly less traction and braking power.
This setup works great for hardpacked surfaces, but when the trail becomes softer or looser you’ll want larger knobs with more spacing between them.
On each side of the center zone, you can find the transition zone. These play a role to help the bike maintain traction when it’s at a moderate lean angle.
The more knobs that are in this zone the better its traction will be. As always, that increased traction does come at the cost of more resistance i.e. less efficiency.
The side zone comes into use during cornering where the bike is more sharply angled. These are usually larger in size compared to the center or transition tread to ensure maximum traction in these situations.
The efficiency loss is less of a concern in this zone as the total time spent using them is far less than the others. Not to mention that the alternative of slipping and crashing in a turn would certainly not be a good outcome!
Tube vs. Tubeless Tires
The classic tire setup involves fitting an inner tube inside of the tire. The tube is then filled with air and pushes against the rim and tire to provide support against the ground.
While this setup has been used for years, it had a habit of leading to many flats in mountain biking. When the bike strikes a sharp object like a rock, the compression force of the rock and rim can be large enough that it causes the tube to rupture.
You’ll hear these commonly referred to as a “pinch flat“. Alternatively, hitting small sharp objects like thorns could be enough to pierce through the tire into the tube leading to a “puncture flat“.
For these reasons, tubeless tires have become popular in mountain biking because they remove the tube entirely. Instead of a tube, tubeless tires are paired with special rims that allow the tire bead to directly lock into the rim itself.
A sealant is then poured into the tire to create an airtight seal against the tire, rim, and valve stem.
Benefits of tubeless tires
With the tube removed, there’s no longer the chance for impact strikes to pop the inner tube since it’s no longer there! The sealant also acts to help seal small puncture holes on the fly.
If the holes are small, the sealant usually works fast enough that very little air escapes from the tire and you don’t even need to stop your ride to fix it. This isn’t to say that you’ll never again experience a flat while riding tubeless, just that there should be far fewer.
Because pinch flats are no longer a concern, you’re also able to ride tubeless tires with a lower air pressure than tubed tires. This allows the tire to better conform to the ground and create an enhanced grip, especially in cornering.
The lower air pressure also leads to a smoother ride since you’re able to roll over small obstacles easier instead of bouncing off them.
The last benefit I’ll point out with tubeless tires is that they’re often lighter because of the removal of the tube. The weight difference is usually in the range of a couple of hundred grams.
While this can be nice, it’s far less valuable compared to the fewer flats and better traction (in my opinion).
Drawbacks to tubeless tires
To be fair, I should point out that there are some downsides to running a tubeless setup. Namely, tubeless setups result in the following drawbacks.
- An increase in price for tubeless-ready tires and rims
- The need to use a tire sealant
- A more involved installation process
For a more in-depth look into this topic, make sure to take a look at my article “Should I Go Tubeless?“.
Mountain Bike Tire Pressure
While technically not a feature of the tire itself, the degree to which you inflate your mountain bike tire pressure can have a huge impact on the tire’s trail performance.
As briefly alluded to in the tubeless section, lower air pressure is beneficial because it allows the tire to better grip the ground and can create a more comfortable ride.
As with anything, there is a limit on just how low you can go with your tire pressure. The tire still needs to have adequate pressure to remain properly seated on the rim and remain efficient at rolling.
Your tires should have markings on them to provide guidelines for minimum and maximum inflation pressures.
There’s also a relationship between minimum tire pressure and tire width. As a general rule, the wider the tire the lower its air pressure can be.
As previously covered, switching to a tubeless setup can also allow you to run a slightly lower tire pressure than tubed tires.
Additional Mountain Bike Tire Features & Terms
The above features are what I consider the keys to understanding your mountain bike tires and how they impact riding performance.
However, when looking online or in the store you’re bound to notice some other features mentioned as well that I’ll cover below.
Rubber compound
The actual type of rubber used in the tire will affect its performance. Tire hardness, or durometer, is one of the main factors. Harder tires will roll faster and last longer but have less grip than softer tires which are better able to conform to the ground.
As should be expected, softer tires will wear down faster and have a shorter lifespan.
Many tires are also now created from multiple rubber types to help get the best blend of these benefits. Tires are typically found in a single, double, or triple compound.
The downside to these multi-compound tires is that they tend to become more expensive with each added type of rubber.
Casing
The casing forms the foundational layer of the tire, onto which the rubber tread is mounted.
It is constructed of synthetic fibers, usually nylon, which are layered in alternating directions.
Additional materials and layers can also be added to increase its puncture protection and stiffness.
TPI
TPI stands for “threads for inch” and is a specific feature of the casing. Higher TPI counts lead to a tire that is lighter and more flexible, but also more puncture prone.
A TPI count of 60 or less would be considered “low”, and creates stiffer, tougher tires that are better suited to aggressive situations like enduro and downhill.
TPI counts above 60 are considered “high” and are better suited to the less aggressive trail and cross-country riding.
Tire bead
The bead is another feature of the casing and acts to hold the tire in contact with the rim. The bead is typically constructed of rigid wire, or a “foldable” kevlar or aramid material.
Wire beads have the advantage of being stronger and cheaper, while foldable beads are lighter in weight and more easily transported.
Sidewall protection
If you spend a lot of time riding in rocky areas then sidewall protection will be important.
Increasing the amount of sidewall protection can be done by increasing its thickness, the number of carcass layers, and adding inserts. Inserts can be made from tough compounds such as Kevlar and nylon.
The downside to sidewall protection is that as it increases, so does the weight of the tire. For this reason, downhill and enduro-specific tires tend to have the most sidewall protection.
Sipes and grooves
Sipes are small zigzag slits in the tires (lugs) These are in place to help add additional grip on hard, slick surfaces.
The small cuts allow the lugs to be more flexible and better conform to the surface that they’re pressing into.
You may also see wider, straight-line grooves or slits that are used to provide similar benefits.
Directionality/placement
Thanks to the advancements in tread design its important to point out that most tires are unidirectional. To take full advantage of them, it’s important to make sure that they’re mounted to roll in the correct direction.
Some tires are also specifically designed as “front” or “rear” tires. In most cases, this comes down to a matter of rider preference. Common mixed-tire setups could include using a wider, grippier tire in front with a slimmer, slicker tire in back.
When to replace mountain bike tires
Just like your car, the decision for when to replace your mountain bike tires will be a tradeoff between time and cost.
The terrain, style of riding, and rubber compound used in the tire all factor into just how long they will last for you. Because of these factors, you could get anywhere from 3,000 – 8,000 miles of use from the tires.
Rather than trying to keep track of mileage, a better approach would be to replace them based on wear. Look for center knobs that have been rounded off and lost half their depth, and sidewall knobs that are cracked or fold over when riding.
These signs will become very apparent during rides as you find yourself losing traction while cornering, or a loss of climbing and breaking power.
A loss of traction of can be a serious safety issue, so rather than trying to squeeze a few more weeks out of worn tires you’re better off replacing them as soon as it starts to become an issue.
When it comes time to purchase a new set of treads, I’ve put together a list of some of the top tires on the market to help save you some time!
Recommended mountain bike tires
Now that I’ve covered all the main features of mountain bike tires you should have a good understanding of how to match tires to specific styles of riding.
Maxxis is one of the biggest names in mountain bike tires. They make great tires that are easy to find both online an in-store in the event you need to quickly replace one.
To save you time searching for tires, I’ve gone ahead and listed a few tires below that are good for their respective disciplines. Note that these are all affiliate links.
Cross-country: Maxxis
Downhill: Maxxis Minion DHF (click here to see on Amazon.com)
Enduro / All mountain: Maxxis
Excellent all-around tire:
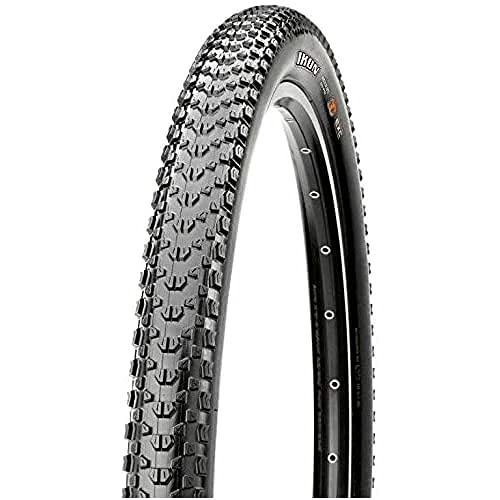
Upsizes our most versatile XC tire to the plus bike platform. With knob sizes and heights optimized for the higher volume and lower pressures of plus bikes, expect the familiar fast-rolling and predictable handling tread with an even larger contact patch for the fastest trail riding experience.
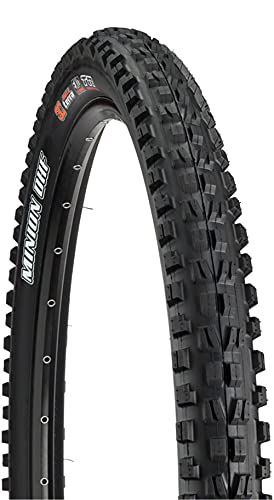
With a tread design that deftly balances rolling speed with braking and cornering traction, it's hard to find fault with the Minion DHF. That's probably why it's one of the most imitated tires in mountain biking. Whether riding local trails, a backcountry epic, racing enduro or World Cup downhill, there's a Minion DHF spec to meet your needs. The Minion DHF is available in trail, enduro, and downhill specs.
The Minion DHRII is the Yang to the DHF's Yin, the perfect complement, and now available for the most capable plus bikes on the market. Proven paddle knobs down the center not only provide decreased rolling resistance compared to the DHF but also offer increased braking when the trail gets loose. You may not notice it outside of the steepest terrain but those knobs allow you to brake harder in the rear to maintain your balance as you let the high volume casing absorb any trail irregularities.

An aggressive tread in high-volume casing, designed with great traction in mind. With a wide variety of size offerings, the Ardent captures every mountain rider's needs.
Before you go, make sure to take a look at my other tire-related resources as well for answers to more frequently asked questions.