
While the gears on a mountain bike seem pretty simple, there’s actually a lot of engineering behind them to maximize efficiency. Rather than provide one-off answers, I have created a complete beginner’s guide on mountain bike gears.
From how they work, how to use them, and the available options, I’ll be covering it all!
Table of Contents
How Mountain Bike Gears Work
Before going any further, it makes a lot of sense to get a really good understanding of how the gears on your mountain bike actually work. This way, you’ll be able to make informed decisions when upgrading cassettes or buying new bikes in the future.
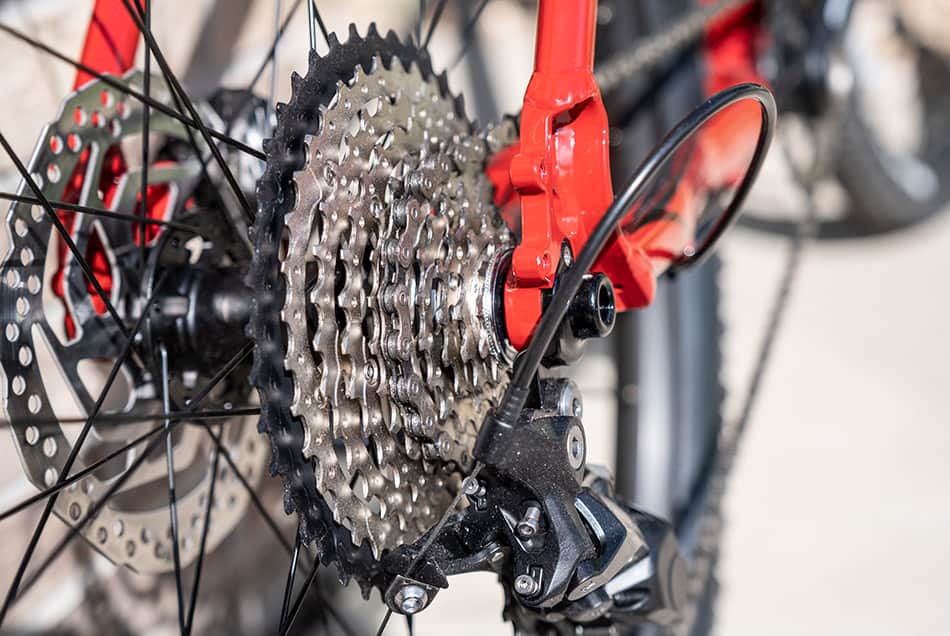
The gears on a mountain bike
Let’s start with what your bike has on it. On the front, you’ll have anywhere from one to three large chainrings. Older bikes will probably have three chainrings up front, while more modern bikes often have one to two.
These chainrings will have sizes that are referred to by their number of teeth. Larger rings have more teeth. Common sizes include but are not limited to 30T or 42T.
In the rear, you will probably have anywhere from seven to twelve gears (also known as cogs). This rear grouping of gears forms the cassette. When looking at the specs for a cassette, you’ll notice that it will have a range listed.
Something like “11-42T” or “10-50T” are examples of what these ranges could look like.
The smaller first number refers to how many teeth are on the smallest cog in the cassette. Whereas the larger number refers to the number of teeth on the largest cog in the grouping.
Each intermediate cog will have an increasing number of teeth that falls inside this range.
The number of gears on your bike is as simple as multiplying the number of front chainrings by the number of cogs in the rear cassette. Thus, a bike with two front chainrings and 10 cogs in its rear cassette would have a total of 20 gears.
How gears work together
Now that you understand the gears on the bike, let’s cover how they actually work together!
As your feet push on the pedals, this causes the crank arms to rotate. Because the cranks are connected to the chainring, they cause the chainring to spin. Last but not least, as the chainring spins it causes the rear gear to rotate via the chain.
As the rear gear turns so does the rear wheel and you’re off and riding! Without a chain connecting the two gears, your pedals would spin freely and the bike wouldn’t move.
The key to how hard it is to pedal boils down to gear ratios. Think of this as simply the number of teeth on the front chainring compared to the number of teeth on the rear cog.
If both had 20 teeth, then this would be a one to one ratio between the two. That would mean that for each rotation of the front chainring, the rear cog would spin exactly one full turn as well.
Where things get interesting are when you start changing this ratio. Let’s say that you’re using 40 teeth up front and 20 in the back.
That’s a two-to-one (2:1) ratio.
The rear cog will perform two full rotations for each full rotation of your front chainring.
However, let’s take a look at what happens when the order is swapped. For 20 teeth up front and 40 in the back, the ratio is inverted and now becomes one to two (1:2).
That means that it now takes two full rotations of the front chainring to turn the rear wheel once.
Why gear ratios matter
Gear ratios matter because they act as a force multiplier.
Let’s say you had a mountain bike with only a single gear i.e., one cog in the front and back. While you might be just fine riding around on flat ground, climbing a hill of any size is going to be very tough!
You’d probably end up hopping off the bike and needing to walk it to the top. Even if you made it, your legs would be worn out from the effort!
Because pedaling uphill would be so hard on one gear, you couldn’t turn the pedals very fast. A low cadence, or revolutions per minute (RPM), can make balance tricky on steep uphills. So even if your leg strength doesn’t fail you, your balance may!
On downhill sections, you would find that you quickly reach a point where you quite literally can’t pedal fast enough to accelerate the bike any further. This is known as “spinning out”, where you hit a maximum number of RPMs.
Of course, this issue only exists on single speeds. Mountain bikes, on the other hand, are equipped to handle these situations.
While all of these scenarios aren’t a problem for a leisurely ride around the neighborhood, it’s a big problem for a mountain biker! You’ll be spending lots of time on a variety of terrains.
From flats to steep climbs and descents, these all require a different gear for optimum performance.
Most bikers find that they pedal most efficiently around 80 RPMs. So rather than changing your effort, you need to change your gear! This allows you to maintain a steady cadence and not overwork yourself trying to struggle up a climb.
Well, that’s the idea, at least 😉
Even with the advantages of gears, there’s still a required element of fitness and technique to make it up and down steep climbs.
What is a low gear on a bike?
Think of your low gear as your easy gear. Just like driving a manual transmission car, this is the gear you use when your speed will be slowest.
It provides the least resistance to turning the pedals and is perfect for climbing.
Since you want to be able to keep up your pedaling momentum and not get stuck with the increasingly hard to turn pedals, you should downshift into your lowest gears.
The “lowest” gear is a combination of your smallest front chainring and largest rear cog. Because the front chainring turns several times for each full rotation of the rear, it’s easier to keep pedaling up that monster hill!
People get mixed up on “low” gears because it’s using the physically largest rear cog. While it’s easy to think big equals high, remember that the ratio of the front to rear cog matters.
What is a high gear on a bike?
High gears are a bike’s equivalent of a hard gear. They are used when the bike will be traveling at the fastest speeds. When you want to turn up the speed on a flat or downhill section, you’ll shift into your higher gears.
Not surprisingly, your highest gear is the exact opposite of your lowest gear. This would be a combination of the largest front chainring and smallest rear cog. In this case, each full turn of the front chainring results in multiple rear cog and wheel rotations. This allows you to move further and faster with each stroke.
How does the bike change gears?
Ahhhhh very good question!
Now that you’re following along with why we have all these gears and what they’re used for, there’s still the practical nature of how the bike actually changes gears.
Sure, we all know they change when you press the shifter, but what’s happening?
In order to fully explain how shifting works, let’s first review all of the components that make up your drivetrain.
Those individual pieces are:
- Chain
- Front chainring(s) i.e. crankset
- Rear cassette
- Rear derailleur
- Shifters
- Front derailleur
Now while every mountain bike will have components 1 – 5, only some bikes will have a front derailleur (#6). The job of a derailleur is to push the chain from one cog to the next.
Because many modern mountain bikes only have a single front chainring, they have no need for a front derailleur and therefore do not come with one.
Unless you’re running a single-speed bike, every mountain bike will have multiple gears in its rear cassette and, thus a rear derailleur.
As the name implies, a rear derailleur is responsible for pushing the chain between gears in the rear cassette.
The derailleurs are connected to the shifters by cables. Pressing the shifter causes the derailleur to move either in or out over the cassette/chainring.
Because the derailleur guides the chain, it leads the chain onto the new gear. Once the chain seats onto the teeth of the new cog and has completed a full rotation, the gear shift is complete.
How to shift gears on a mountain bike
While the practical nature of shifting gears may seem as easy as just clicking the shifter, there are a few shift-related techniques that are good to follow.
These will help to ensure that you have fewer dropped chains and reduce the wear and tear on the drivetrain.
The basic gear shift
When pedaling gets too hard or too easy, it’s time to shift gears! Shifting in advance of hard climbs is recommended 😉
- While still pedaling, slightly ease up your stroke.
- Click your shifter once to make a single gear change.
- Continue pedaling through the shift until it completes. Do not stop pedaling or push really hard while the chain is transitioning to the new gear.
- You may hear a little bit of noise and clicking while the chain is transitioning to the near gear. It should go quiet once the shift is completed.
Reference for common bike setups:
- The left shifter controls your front chainrings. Use it for larger gear jumps.
- The right shifter controls your rear cassette. Use it for small gear jumps.
- On the right shifter, the lever closest to your body (and thumb) is pressed inwards to shift into a lower gear. The second lever (closer to your index finger) is pulled inwards to shift into a higher gear.
A few additional tips on proper shifting technique
- Anticipate your shifting and try to get into the proper gear before you need it. Downshift into your low gears before entering sharp turns so that you’ll be able to easily accelerate out of them.
The same goes for large climbs. Do your best to get into the correct gear before hitting that incline! - Use the rear derailleur for small jumps in gears, and the front derailleur for larger jumps (if you have one).
- Avoid shifting your front and rear gears at the same time. You can shift one and then the other, but avoid shifting them together. If you’ve got a single front chainring, then this won’t be a concern.
- Once again only relative to bikes with multiple front chainrings, try to avoid cross-chaining. Crosschaining occurs when you create the largest chain angle by using the largest front and rear cogs, or the smallest front and rear cogs together.
This places high stress on the chain and can lead to dropped chains. Instead, use intermediate gear combinations to get the same gear ratio.
Do you shift gears while pedaling?
You need to be pedaling to maintain chain tension and help thread the chain onto the new cog. Most people make the mistake of trying to shift gears while pushing really hard uphill.
Trying to apply maximal force to the pedals while the chain is transitioning on to a new gear is just asking for a dropped chain!
To avoid this from happening, use a power stroke. This involves giving one or two really hard pedal push to gain a little extra momentum, then taking a soft 1-2 pedals while you perform the shift.
Once the chain has successfully transitioned to the near gear you can resume the hard pedaling.
If you can hear the drivetrain clanking and grinding during a shift, that’s probably a sign that you’re applying too much force mid-shift.
In the event that you hear these types of sounds during every shift, then that’s a good sign that your drivetrain needs adjusting.
Keeping the drivetrain clean, well-oiled, and properly adjusted is key to both optimal performance and minimizing wear.
Which gears to use on a mountain bike
Exactly which gears you use will be completely dependent upon the terrain. Lots of climbing will result in more time spent in low gear. Whereas flat or downhill sections will use higher gears.
As you can see, this is really just a general statement. Every rider has a different level of fitness and preferred cadence, so what works for others may not work for you.
The only way to truly find out is to simply go out and ride!
While you will likely find a preferred cadence, much of this goes out the window in technical terrain. At this point, you will be solely focused on traversing the obstacle safely instead of pedaling efficiently!
Common gear configurations
The most common gear configurations for modern mountain bikes include one or two front chainrings. Bikes with single front chainrings are referred to as “1x” or “one-by”. Whereas you’ll see bikes with two front chainrings abbreviated to “2x”.
Older mountain bikes often came with three front chainrings. However, this has largely fallen out of popularity for one-by and two-by setups.
Not that there’s anything wrong with three chainrings, just that they are usually overkill for mountain biking.
Common gearing options:
- 1×10, 1×11, 1×12
- 2×10
- 3×10
Mountain bikers typically need larger gear jumps to accommodate rapidly changing trail conditions and don’t have a need for as many intermediate smaller jumps.
By comparison, these smaller jumps are really helpful in road riding where they help a rider find the perfect cadence.
Dropping one or two chainrings using a 1x can also help lower the bike’s overall weight.
Choosing between a one-by or two-by setup is largely a matter of preference. While one-bys are lighter because they lose a chainring and front derailleur, they require larger jumps between gears.
This means that a rider has fewer options for finding their perfect cadence. They may also have to work a little harder in certain situations to power through a climb in suboptimal gear.
However, for stronger riders, this may not be an issue.
Another benefit of one-by setups is simplicity. You only need to worry about working a single shifter! This can be helpful for new riders as it’s one less thing to worry about on the bike 🙂
Also, thanks to the fewer moving parts, you’ll have fewer components that can fail or cause a maintenance issue.
Maintaining the gears on your mountain bike
Cleaning the gears
Keeping the gears clean on your mountain bike will be really important to keep them functioning well.
The drivetrain is the dirtiest part of the bike! Let that gunk build up for too long, and you’ll find that your shifts aren’t as smooth and probably experience dropped chains more often.
Hot soapy water and a brush is always a good place to start. However, in many cases, it takes the addition of a degreaser to really scrub the grime off your front chainring and rear cassette.
The gunk that accumulates from dirt and chain oil is quite impressive!
There are even special tools to help get in between each of the cogs. Park Tool makes a nifty gear cleaning brush with a brush on one end and a curved thin tooth section on the opposite to help get into all the crevices.
You can take a look at it here at Amazon.com.
Derailleur alignment
Between crashes, transportation, and general use it’s not uncommon for front or rear derailleurs to get knocked out of alignment.
Since the derailleurs are the primary mechanism controlling which gear that the chain is on, it’s important that they’re correctly aligned.
A sure sign of a misaligned derailleur is missed shifts and a loud drivetrain. When it’s properly aligned it’s quiet as a whistle! If you suspect that your derailleurs need to be adjusted, take at my guide to each in the links below.
Click here for a guide to aligning your rear derailleur.
Click here for a guide to aligning your front derailleur.
Chain replacement
Along with keeping your gears clean, replacing your chain is another key to keeping them functioning well. As chains wear, they get longer, sometimes also called “chain stretch”.
Just how far a chain has worn can be verified using a chain checker tool. While the rear derailleur will help maintain some tension, a loose chain will create excessive wear on the gears over time.
Typically, you will go through 2-3 chains before the gears themselves wear out. However, chains are much cheaper and easier to replace so it’s best to replace them as needed.
Cassette/chainring replacement
Even with good maintenance, your gears will eventually wear out at a certain point. Most rider’s get at least one thousand miles out of their cassette, however, it does vary from rider to rider.
You can tell that it’s worn when the bike starts have trouble shifting and the teeth in the cogs have a shark tooth-like appearance.
For a detailed, step-by-step guide on replacing your cassette click here.
So helpful! Thank you! I just changed my gearing and my crank length and everything feels off. I’ve been struggling to understand in my brain what I can understand in my body when riding, and you’ve laid it out so articulately here. I appreciate it!