
There’s nothing more frustrating than a mountain bike chain that keeps coming off! In some cases, a dropped chain is a one-off occurrence, but if it continues to happen then there’s likely a good reason for it.
With that, let’s jump in and take a look at 17 common reasons why your mountain bike chain may be coming off!
Chain drop reason #1 – The drivetrain is worn and needs to be replaced
How long has it been since your drivetrain was replaced? If you’ve put more than a thousand miles on the drivetrain and the chain consistently slips off the back, then it very well could be time to look into replacing the drivetrain.
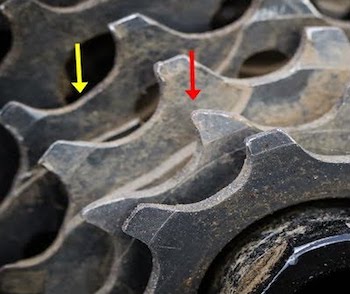
Inspect the teeth of the cogs in the drivetrain. If the teeth have become hooked and shark-tooth looking, then it’s probably time to replace them.
This is usually more noticeable in the gears you use the most.
While it’s sometimes possible to just replace the individual cogs, it’s usually easier and more practical to replace the entire cassette.
Chain drop reason #2 – The chain is stretched

Technically, chains don’t stretch but they do elongate! This happens over time as the internal components of the chain start to wear down.
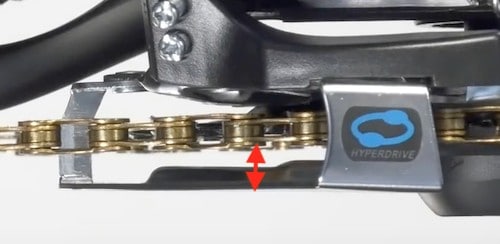
If you’ve got a chain checker (see above), this is really easy to figure out. Most tools have two sides, one marked with a “0.5” and the other with “0.75”. These labels indicate if the chain has stretched 0.5% and 0.75% from its original length.
Using the 0.5 side, install the hook end into a link with inner plates to ensure that you’re able to get an accurate measurement against the roller. Allow the other end of the tool to fall downwards and see if it’s able to fall into the gap of the next roller.
If the chain check doesn’t fit in – that’s a good sign! It means that your chain has stretched less than 0.5% at this point and does not need to be replaced. If it does fit in, then it has stretched 0.5% or more.
Flip the tool over and repeat the test using the 0.75 side. If it’s able to slip in, then it means your chain is at least 0.75% longer. The decision to replace the chain for numbers at or below 0.75 will be dependent upon the number of rear gears.
- 0.5% – Replace the chain if you have 11+ rear gears
- .75% – Replace the chain if you have 10 or fewer gears
- 1.0% and up – Replace the chain if you have a single speed or two-sprocket bike

Now you can quickly and accurately determine the wear of nearly any bike chain with the Park Tool CC-2 Chain Checker. Simply insert the Chain Checker’s pins into two links, lightly press the swing arm gauge, and then check the gauge window for an accurate reading.
Chain drop reason #3 – The chain is clogged with dirt and grime
If your chain is downright filthy then it’s not going to operate well. Think about how poorly your car would run if you NEVER changed the oil! Well, cleaning and oiling your chain is your bike’s equivalent of a car’s oil change.
Dirt and grit can work their way into the chain components and cause it to not move smoothly over the cogs. Because they don’t articulate as smoothly, it’s much easier for the chain to drop off during bumpy trails sections.
Depending on just how dirty your chain is, you may need to run through a full cleaning session with a degreaser before re-oiling the chain. However, you can also try using chain oil and a few clean rags to spin it clean as a shortcut.
Note that you’ll probably have to repeat this process a few times if the chain is particularly dirty.
Take a look at my in-depth guide on chain cleaning for more specific details on this process.
Chain drop reason #4 – A stiff link in the chain
Even if you’re doing a good job keeping up with your chain maintenance, sometimes all it takes is a single stiff link to pop the chain off. A stiff link will have a hard time bending around the chainrings and jockey wheel, leading to mishaps.
If oiling the chain doesn’t fix it, slowly backpedal the chain while watching the rear derailleur. Carefully watch for a link that jumps and clicks as it passes over the jockey wheel.
If you’ve got a chain tool, you can use it to help work the link loose.
Otherwise, use your hands to fold the stiff link and try bending it side to side until it’s able to move smoothly again (in the correct direction). Gloves are recommended for this approach.
Chain drop reason #5 – Excessive chain angle
Did you chain drop when you were riding cross-chained? This happens when you’re using the largest ring in the front and back, or vice versa.
Doing so creates an excessively slanted chain angle that stresses the hardware and causes chain rub, eventually leading to a dropped chain.
The good news is the fixing this issue only requires you to be more cognizant of your gear usage during rides.
Rather than using the extremes of your gears, stick to more intermediate combinations to prevent excessive chain angle and give yourself more options for shifting (up or down).
Chain drop reason #6 – Just replaced your chain and it’s the wrong size
Did you just replace your chain? Are you sure that the new one is the right size? With a chain that’s new or very lightly used, chain stretch can’t be the issue since it hasn’t had enough use yet.
If you’ve still got the old chain, you can compare the length of the two. Because the old one will have stretched, your new one should be a little bit shorter.
If the chain is too long and has too much slack, you will probably need to remove a couple of links to obtain the proper length.
A chain that is at the proper length should be able to reach the large-large gear combination, and not have the rear derailleur overlapping itself when in the small-small gear combination.
Chain drop reason #7 – New chain and is not compatible with the drivetrain
Assuming that you’re not rocking a single-speed mountain bike, then your bike is using a derailleur bike chain. Derailleur bike chains are designed to allow the chain to transition from one sprocket to the other during shifts.
As the number of gears in the cassette increases i.e. 10 to 12, the spacing between the cogs often gets smaller. To allow for proper shifting, chains follow this trend and also get narrower to accommodate the narrower spacing.
For this reason, chains are manufactured for use with a specific speed drivetrain.
- Double-check that your chain speed is compatible with the drivetrain.
- Verify that your drivetrain doesn’t require use with a specific chain. For example, most 11-speed drivetrains are not cross-compatible with chains from other manufacturers. Stick with all Shimano, SRAM, Campagnolo, etc…
Chain drop reason #8 – The chainring or chainring tooth is bent
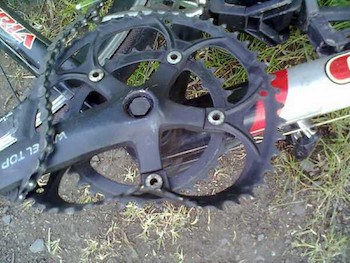
While most cases are nowhere near as severe as the one pictured here, a bent chainring or even chainring tooth can be your source of dropped chains.
Accidents are the most common cause, however, a bike that simply topples and strikes a hard surface could be enough to bend a chainring tooth.
Inspect the chainring by backpedaling and seeing the distance between the chainring and frame changes. If the eye test is hard to judge, brace your hand against the frame and try gently pushing something into the chainring while it’s rotating.
If you feel a sudden change in resistance pushing back against your hand it means that the ring is bent. Badly bent chainrings will have a very apparent wobble to them while turning.
Because many modern mountains have only 1-2 chainrings, it’s not likely that you don’t use them. You can try to use a wrench to gently bend the chainring back into place, or they also make specialized chainring straightener tools as well.
If you don’t want to go to the hassle or the chainring is really in terrible shape, then just ahead and replace it.
Chain drop reason #9 – The rear derailleur is out of alignment
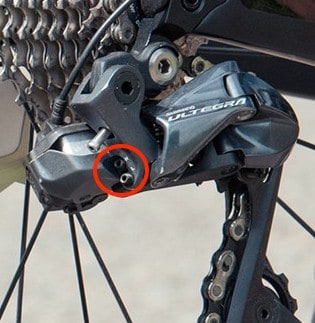
Not only can poor alignment of the rear derailleur lead to noisy shifts, but it can also lead to chain drops in severe cases of misalignment.
Limit screws control how far the derailleur can travel inward and outward. They prevent the chain from going into the spokes or frame.
Definitely not something that you want to happen on a ride!
Steps to adjust the rear derailleur:
- Before making any adjustments, start by shifting your chain onto the largest front chainring and the smallest cog in the rear.
- Continue clicking the rear shifter even after it reaches the smallest rear cog until it stops clicking to ensure that it’s fully extended.
- Then, loosen the barrel adjuster by turning it counter-clockwise by a couple of turns. Doing so provides slack to the cable so that the shift position and limit screw settings don’t interfere with each other.
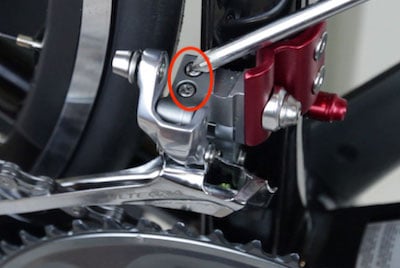
- There are two screws, one typically labeled with an “H” and the other with an “L”.
- Using a screwdriver, tighten the “H” screw by turning it counter-clockwise by a half to full turn. Doing so should cause the chain to slightly rub against the second smallest cog and make noise.
- Slowly loosen the “H” screw by turning it clockwise in quarter-turn increments until the noise quiets down during pedaling. If you have a front derailleur, ignore any noise coming from it for now.
- Re-tighten the barrel adjuster by turning it clockwise a couple of turns.
- To adjust the “L” screw, start by shifting to your second largest front chainring, and the second-largest cog in the back.
- Try shifting onto the largest rear cog. If the chain jumps smoothly and isn’t making any excessive noise, then the “L” screw is too loose.
- Shift back to the second largest rear cog, then tighten the “L” screw by a half turn. Repeat this test until it’s very noisy, or jumps slowly or not at all when shifting to the largest rear cog.
- Like the process with the “H” screw, slowly back off the tightness. Loosen the “L” screw in quarter-turn increments and test to see that it jumps quickly to the largest cog and is quiet.
Chain drop reason #10 – The rear derailleur hanger is bent
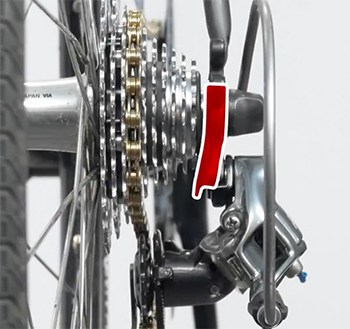
Inspect your rear derailleur hanger to see if it has been bent. It should be perfectly parallel to the cogs, and not bent inwards or outwards.
Use a wrench or another tool to manually bend it back into alignment.
Be aware that this process could cause the hanger to break, so it helps to keep a spare on hand.
Chain drop reason #11 – The rear derailleur clutch has failed
With the increasing popularity of one-by drivetrains, clutches were introduced to help adjust the tension on the rear derailleur. This helps keep more tension on the chain and prevent it from bouncing as much.
If you’re experiencing issues with maintaining chain tension, then it could very well be due to a small component failure inside the clutch.
If you suspect this to be the case, get in touch with your local bike shop or the manufacturer as the part may be under warranty and can be replaced free of charge.
Chain drop reason #12 – The derailleur(s) needs to be cleaned
Much like your chain, the derailleurs are not going to function well when it’s extremely dirty. Use a brush coated in degreaser to remove buildup from anywhere on the derailleurs.
Don’t forget to use hot soapy water afterward to knock loose any remaining gunk, and remove any degreaser that was left behind.
A final fresh water rinse will complete the cleaning process.
Chain drop reason #13 – The front derailleur has shifted
Skip this potential cause (as well as the next two) if you’re running a one-by setup as you don’t have a front derailleur to worry about!
If you have a front derailleur, then start by checking the cage height. A cage that is too high could allow the chain to jump off during shifts. Cages that are too lower would run into the larger chainring. Ideally, the cage should be 2-3 mm above the teeth of the largest chainring.
In the event that the height is correct, it could be that the angle of the cage is wrong. The cage should be parallel to the chainring. Cages that are misaligned will result in twisting the chain and potential drops.
Chain drop reason #14 – The front derailleur is out of alignment
Now that you’ve got the front derailleur in the correct position, it’s time to adjust its limit screws. Like your rear derailleur, the front derailleur has “L” and “H” screws for adjustment.
The goal is to minimize the distance between the cage and chain without causing chain rub.
Steps to adjust the front derailleur:
- Start by shifting to the smallest front ring and largest rear ring.
- Slacken the barrel adjuster by loosening it by a couple of revolutions.
- Turn the “L” limit screw to pull the chain as close as possible to the inside of the cage (closest to bike frame) without allowing them to rub.
- Re-tighten the barrel adjuster to its previous position.
- Test shifting from the larger front ring to the smallest to ensure that the chain jumps quickly and smoothly. Loosen the “L” screw by a quarter turn if there’s a delay in the chain transition.
- To adjust the “H” screw, begin by shifting to the smallest rear cog.
- Try shifting to ensure that you’re able to shift onto the largest ring. If you’re not able to, you need to loosen the barrel adjuster until it’s able to complete the shift.
- Once on the largest ring, loosen the H-limit screw by several turns.
- While holding in the front shift lever, check the outside gap between the chain and cage. If the gap between them is greater than 1 mm, then it’s too loose. Take a look at the image below step 11 for reference on this gap.
- Tighten the H-limit screw in quarter-turn increments until the gap is 1 mm. Make sure that you’re not holding down the shifter during tightening.
- Test the final adjustment by confirming that you can still shift off the largest front ring. If you’re not able to or the shift seems slow, then the limit is too tight. Loosen in quarter-turn increments until it shifts smoothly.
Chain drop reason #15 – Did you just take a big drop, hit a big bump, or crash?
If your chain came off after a big impact it may just be that you need to install a chain guide or chain tensioner to help it stay in place.
This is particularly useful during large drops or extremely rough downhill sections to avoid chain slap.
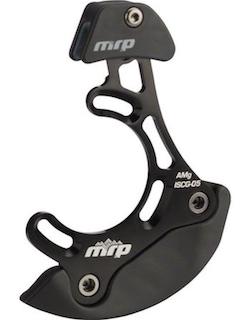
The quickest fix is to add on a chain guide. MRP makes cage-like one that resembles a front derailleur with a bottom bar to prevent the chain from flopping too far downwards.

Compatible with drivetrains with clutch-based rear derailleurs or ones using additional chain-retention rings, the AMg has a simple, effective design that guards, rather than guides, your chain through a ride.
Chain drop reason #16 – Were you backpedaling and shifting when it fell off?
First of all – why were you backpedaling? If you’re that bored on the trail, it’s time to try out something more challenging!
In all seriousness, if your chain does fall off while backpedaling then it’s probably something related to the rear derailleur. Follow the instructions listed in reason #9 to align the rear derailleur.
Once that’s been done, it’s also worth checking that the rear derailleur hanger has not been bent as described in reason #10.
Chain drop reason #17 – Were you pedaling hard when the chain came off?
Assuming that you’ve already adjusted your derailleurs, don’t have worn chainrings, and a proper length chain, then there a few possible suspects.
The source of chain drop here can be hard to pin down, so you’ll have to check each of these items one by one to see what the cause might be.
- Verify that chainring bolts are tight
- Confirm that the cassette is not loose
- Check that your rear wheel is not loose
If you found this article helpful, make sure to take a look at some of my other related articles below!