If you’ve ever asked around about what the best mountain bike tire pressure to use is then you’ve probably gotten a wide variety of answers! Funny enough – none of them are wrong!
This is because the “ideal” tire pressure in mountain biking depends on a wide variety of factors. Run your tires too high and you may find the bike harder to handle, while too low of pressure can lead to bottoming out and potentially damaging your rims.
The majority of mountain bikers use a tire pressure between 20 psi to 40 psi, with typically slightly more air pressure in their rear tire. Tire pressure is further impacted by factors such as tire type, width, and construction, as well as the terrain, conditions, and rider weight.
As you can see that’s still quite a wide range of tire pressures to use. So, let’s jump in to discover how each of these factors plays a role in the ideal tire pressure for you!
1. Tubeless vs Tubed
While it may seem counterintuitive at first, tubeless tires can be run at a lower pressure than their tubed counterparts! Because of their inner tube, tubed tires run the risk of a pinch flat when riding with too low of a pressure.
Pinch flats often occur when the tube is pinched between the bike’s room and a hard external surface like a rock or root. They can also be caused by small sharp objects like thorns as well.
The sharp impact causes the tube to pop, leaving you to deal with patching or replacing it on the trail. With a tubeless tire, at least there’s no tube in place to worry about popping!
2. Rider Size, Experience and Riding Style
Let’s consider the role of a tire. No really!
Simply put, their job is to support a rider’s weight so that the wheel can turn across the ground while enhancing grip and comfort.
The rider’s weight presses down, while the tires press against the ground and in turn exert this force back upwards due to being inflated.
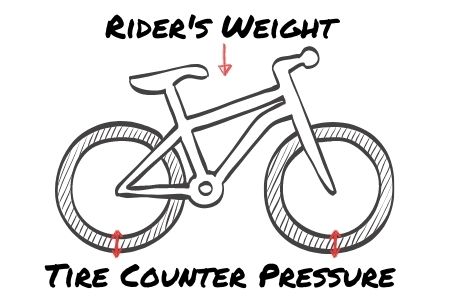
Now because some rider’s are heavier than others, this means that they may need to run their tires with slightly more air pressure to balance their own downward force.
Make sense?
This doesn’t just stop with weight, but also how you ride as well!
If you’re going to be tackling big jumps or riding really aggressively, you may also need to run with slightly more pressure to make up for this extra downward force.
3. Terrain and Conditions
One of the key things that tire pressure impacts is the tire surface area that makes contact with the ground.
The lower the tire pressure, the more that the tire can “squish” (super technical term) and make contact with the ground. This may surprise you, but this extra surface area actually gives you more traction on the trail!
For this reason, you may want to consider using slightly lower tire pressure than normal on wet or muddy trails to maximize your traction. By comparison, dry trails warrant no need for a change!
The same also applies when you’ll be riding on different types of terrain such as a soft dirt trail versus a hard rocky one. For more aggressive rocky trails, you’ll want to consider a slightly higher pressure to accommodate for the impacts that are bound to occur when smashing into a rock or other hard surface.
Snow and sand are trail conditions that call for the lowest tire pressure. Using high psi in those conditions can cause tires to lose traction and spin out. Using the widest tires possible to maximize contact area is highly advised!
4. Rim & Tire Width
Wider rims require (slightly) wider tires. Makes sense so far, right?
Because these wider tires likely have the same casing thickness, they need to run a slightly lower tire pressure to maintain the same casing tension.
If that sounds crazy, then FLO cycling has a great article that you should check out. They go really deep into the math and equations that explain all of it!
Keep in mind that you’ll still want to respect the stated guidelines for maximum and minimum pressure for the tire, so there’s no get out of jail free card here 😉
5. Rear vs Front Tire
Many riders put 2-3 more psi in their rear tires than front tire because more weight is supported by the back tire.
While you may start out with using the same tire pressure in the front and back, most people experiment until they find what works best for them. This is something that you’ll learn over time and slowly adapt, so it’s not a big thing to worry about on day 1.
6. Tire Compound and Casing
The casing and compound used in constructing the tires help to determine the amount of tire pressure they are designed to hold for good grip, durability, roll and puncture resistance, support and a more flexible, supple feel.
Some tires use additional compounds i.e. 2C vs 3C to make the tire more supple. Other use different approaches to their use of threads per inch (TPI) for the casing.
A low TPI casing like 60 results in a stiffer material that is more puncture resistant, and can therefore use lower pressure. By comparison, a high TPI like 120 will feel more supple and need a slightly higher tire pressure to compensate.
7. Temperature
Have you ever noticed that your car’s low tire pressure indicators seem to magically go off more often in the winter? Well, that’s because temperature has a big correlation with pressure!
As temperature goes down, so does your tire’s pressure!
This doesn’t necessarily mean that you’ll need ride your bike at a different pressure, just that you’ll want to account for its changes.
Fore example, if your tires are perfectly inflated in your warm garage, then it’s highly likely that they’ll be under-inflated by the time you reach the trailhead if it’s cold outside!
Make sure to prevent this from happening by adding a few more PSI in advance. Or better yet, bring that pump along so that you can top them off once they’ve stabilized for the outside temperature.
This is also something that you’ll want to consider for mid-ride adjustments if you expect their to be large fluctuations in temperature as well.
Signs That Your Pressure Is Too High
The most obvious sign that you have too much air your tires is that you just have no traction!
If you feel your bike slipping and sliding around, then there’s a high likelihood that you’re running your tires with too much pressure.
The same can also be said if you find your bike literally bouncing off anything that it hits! While you should expect some rebound, it shouldn’t be so drastic that it seriously affects your riding.
Signs That Your Tire Pressure Is Too Low
When there’s too little air pressure in your tires, they will lose or burp air when you
hit a rock or turn sharply around corners.
Your rims will feel bendy, and you may even hear a ding when hit rocks! The bike will also drag on climbs and the tire may even roll off the rim.
If you notice any of these signs, it’s probably best to add some air to your tires before you hurt the bike or yourself!
Personalization is Key!
While all of these factors are something to take into consideration, it’s not the end all be all. Your own preferences will still play a large role here!
So spend some time testing different pressures and combinations to see which works best for you. Remember that this may change from bike to bike as well, so it’s something that will keep evolving.
If you’re still not sure where to start, try the following general guidelines as a starting point for your mountain bike tire pressure.
| Tired Width [inches] | Tubeless Pressure [psi] | Tubed Pressure [psi] |
| 2.1 – 2.4 | 25 | 30 |
| 2.8 – 3.0 | 18 | 21 |
Recommended Reading
Before you go, make sure to take a look at some of my other tire-related articles as well!