

Instead of spending the winter sitting around wishfully waiting for spring to come so you can ride your mountain bike again, how about leveling up your training over the winter? Even when the trails are frozen and covered in snow, there’s no reason that you can’t be preparing your body the upcoming season.
In this article, I’ll be covering the best ways for mountain bikers to prepare themselves over the winter. From training to recovery, I’ll get into all of the nitty-gritty details of what I consider to be the pillars of offseason mountain biking training.
Table of contents:
Weight training for mountain biking
You’ve just spent several months furiously pounding the trails. While you loved every minute of it (or most anyway), your body quite literally took a beating. Thousands of revolutions of the pedals, hours on a tiny saddle, arms and hands vibrating until they were numb.
While mountain biking isn’t the only sport that leads to overuse injuries, it’s certainly a fact that you’re going to have to face. By using a smart weight training regimen in the offseason, you can not only undo the prior season’s damage but also prepare it for the upcoming one.
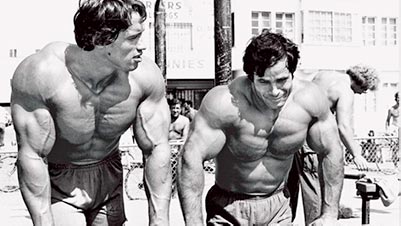
Most people’s minds immediately jump to bodybuilding legends like Arnold Schwarzenegger or Frank Columbo when they think about weight training.
Not only is that not our goal, but there’s basically zero chance that you’ll end up with muscles like these guys. You’re probably in the wrong sport anyway if you somehow do 😉
Weight training should be applied in a way that’s restorative and helps injury-proof you for the future. This starts with tackling the muscle imbalances that are developed by spending all that time on the bike!
Strength imbalances from riding
Compared to road biking, mountain biking truly is a total body effort. However, even with all of the changing positions, imbalances will inevitably develop. The quadriceps (front of the leg) are the primary sources of pedaling power. While the glutes (butt), hamstrings (back of the leg), and calves also help, they do so to a lesser degree than the quads.
Even with the variety of positions, you’ll inevitably spend plenty of time pedaling in the saddle. This can lead to sore low backs and short tight hamstrings, as well as imbalances in glute activation. The good news is that there are plenty of exercises to help correct this.
Looking at the upper body, the shoulders and arms handle much of the load. However, the muscles of the upper back and chest certainly come into play at times. Carrying a pack can also lead to unconscientious shrugging of the shoulders that really tires out the upper traps on long rides. For these reasons, we’ll look to use corrective exercises that strengthen the entire back musculature and correct its posture.
Corrective exercises for mountain biking
While there are thousands of exercises to pick from, I think that choosing ones that have the muscles work together will be your best bet. Not only will they help to correct imbalances, but they re-teach the muscles how to properly work together in unison.
As an example, you could do isolation movements like machine hamstring curls, but we all know that hamstrings would never work alone in real life. It’s better to use them (and others) in a way that requires stabilization and assistance from the surrounding musculature.
Because of all the time spent pushing with the quads, seated or in a leaned forward position, or bracing with the upper body, I’ll show you exercises to balance out these usage patterns.
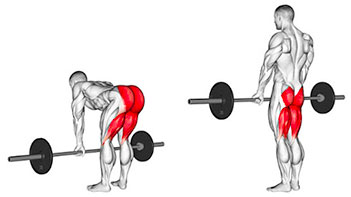
Corrective exercise #1 – Romanian Deadlift (RDL)
I can’t tell you how much I love Romanian Deadlifts (“RDLs” for short)! While many people are familiar with traditional deadlifts, they have too many shortcomings to make this list. The primary movement pattern trained by the RDL is the hip hinge.
While the RDL is a fantastic exercise for the hamstrings, it also works the glutes and low back in unison. The abbreviated range of motion makes it much easier for newcomers to safely benefit from the exercise while working around any mobility or flexibility restrictions.
Last not least, because it uses lower weights than a traditional deadlift it involves less axial spinal loading.
How to perform the RDL:
- Stand with your feet hip-width apart. You can have your feet pointed straight forward, or very slightly turned out.
- Your chest should be up, your back straight, and your abs braced.
- Put a slight bend in the knees to unlock them (around 1-2 inches is plenty).
- While keeping your back straight, begin to push your butt straight back.
- Continue to slowly push your butt back. Imagine as if a string were tied to your butt and pulling it straight back, parallel to the ground.
- Do not allow your back to round at any point.
- As your butt travels backward, your knees will naturally bend and your torso will begin to fold forward.
- Unless you’re also a secret yogi, it shouldn’t take much backward travel of your butt before you feel a lot of tension in your hamstrings!
- Continue pushing your butt back until you feel like you’ve nearly reached your hamstring limit, but have not rounded the low back. If you allow your hands and arms to drop straight down, most people’s fingers will be anywhere from just above to just below the knees at this point.
- Slowly reverse the movement until you’re back to the starting position.
For beginner’s, this movement can be tricky because many people are so bad at hip hinging! All the time we spend sitting on a chair, couch, or bike ruins this movement pattern. But that’s exactly why we all need to practice and get better at it!
For the visual learners out there, linked below is a video demonstrating the RDL by the infamous strength coach Mark Rippetoe.
Loading and intensity for the RDL
Practice with just your body weight until you feel like you have mastered the motion. Only after you feel comfortable should you add any load. This can be done by holding dumbbells, kettlebells, or a barbell in the hands. Allow them to gently drag down the front of the thigh to ensure that they stay close to the body.
Once you add weight, make sure that your shoulder blades stay slightly pulled back. This keeps the shoulder back and helps prevent rounding during the descent.
Aim for a weight that allows you to perform 8 -12 repetitions with perfect form, and work up to doing 3 sets of RDLs. On subsequent workouts, increase your repetitions per set before increasing the weight.
For example, let’s say that you performed 3 sets of 10 reps with 95 pounds this week. If that was moderately tough, then try to do 3 sets of 11-12 reps with 95 pounds the following week. Once you’ve hit the top end of the rep range, you can increase the weight by 5-10 pounds and start back over at 8 reps per set.
Corrective exercise #2 – Straight arm pushdown
While the RDL places most of the emphasis on the lower body, I’m going with the straight arm pushdown to tackle some of the upper body imbalances. This exercise trains the lats, lower traps, low back, triceps, and abdominals. Talk about a lot of bang for your buck in one simple exercise!
While it may appear overly simplistic, it’s able to train many of the back’s muscles while also forcing your entire core to brace for stabilization. There aren’t many other exercises out there that recruit so many muscles so effectively!
While this exercise is best performed using a bar attached to an overhead pulley, it can also be performed with bands hung from a high bar. A double rope handle attached to the pulley or bands can also be used in lieu of a bar.
How to perform the straight arm pushdown:

- Stand tall with your feet at shoulder width. Note that your feet should not be directly underneath the bar, but far enough back so that you can reach forward to grab it.
- Grasp the bar attached to the overhead pulley station with an overhand grip (palms down). Your hands should be spaced slightly wider than shoulders.
- Bend slightly forward and brace your abdominals.
- Using your hands, slowly drive the bar down until it comes in contact with the thighs. If you are using double cables or the bar has bent ends, you should actually be able to get your hand past your thighs before making contact.
- Pause momentarily at this bottom position, then slowly allow your hands to return to the start. In order to get the full benefit of the movement, it’s key that you control this slow return the entire way up instead. Simply relaxing your muscles and letting it fall up is not beneficial.
This time the demonstration video comes from Jeff Cavaliere, a trainer and physical therapist who works with professional athletes. While you can jump straight to watching Jeff demonstrate the exercise at 1:23, I’d actually recommend listening to his intro where he makes some great arguments as to why the straight arm pushdown is such a valuable exercise.
Loading and intensity for the straight arm pushdown
Start with a very lightweight on this movement so that you can learn the movement pattern and not worry about struggling with the weight. It’s key to engage the entire core so that it acts as a stabilizer through the entire movement. You’ll feel your abs burning at the end of the set when you do it correctly!
Like the RDL, aim for a weight that allows you to perform 8 -12 repetitions with perfect form, and work up to doing 3 sets of RDLs. On subsequent workouts, increase your repetitions per set before increasing the weight.
Corrective exercise #3 – Bulgarian split squat
With the next exercise, we’ll be putting the emphasis back on the legs. This time with the Bulgarian split squat. You may also hear this exercise referred to as a “rear foot elevated split squat”.
While “squat” is in the name, it’s more of a hybrid squat and lunge. One of the biggest benefits of this exercise is that it’s performed unilaterally, meaning one leg at a time. This allows us to strengthen the legs independently and correct strength imbalances between the legs.
Thanks to the balancing, it’s also a great trainer of your core for stability. The quads, hamstrings, glutes, and calves all contribute during the movement. It also places emphasis on the VMO in the quad, which is known for being a big generator of power in pedaling.
While the image below shows the demonstration using dumbbells, it’s fantastic as purely a bodyweight exercise. It’s much more challenging than you expect because the front leg is forced to both balance and lift most of your body’s weight.
How to perform the Bulgarian split squat:

- Locate a box, bench, or other stable surface. Stand close to it facing away. Lift your left leg, and place the top of your foot on it.
- Step away from the box with your right leg. The distance out should be approximately the length of a normal walking stride (the distance shown in the reference image above is too close).
- Start lowering by first flexing at the hip (hip hinge again). Allow your knee to bend and your torso to slightly angle forward. Around 20 degrees of forward torso tilt is typical. While your knee will bend, it should not push forward. The drop should be straight down.
- Allow yourself to slowly lower down until your knee is a few inches off the floor.
- Reverse the direction by driving straight upwards. At the top of the movement, make sure to push both your hip and knee into full extension.
Demonstration video once again from Jeff Cavaliere. He even goes so far as to proclaim the Bulgarian split squat the “single greatest leg exercise”, so you know he’s a fan of it! The demonstration and exercise cues begin at 1:05 if you want to skip the preamble.
Loading and intensity for the bulgarian split squat
While the Bulgarian split squat may look and sound easy, I can assure you that it takes practice to do right! For this reason, I highly recommend starting with body weight alone. Once you can perform 3 sets of 12 perfect reps per leg, then feel free to start adding weight.
I highly prefer to use dumbbells or kettlebells for loading this exercise. While you could put a bar across your back, it’s not going to be easy to bail out of if you lose your balance.
Because these can be so challenging, I don’t mind hitting a little bit lower rep ranges with these. Anything from 6-12 reps per leg per set is good. When starting the set, I’d recommend starting with your weaker or non-dominant leg first. Focusing on the weaker leg will allow it to catch up in strength and balance faster.
Weight training conclusion
Keep in mind that these are just some of the exercises that can be done to correct imbalances and strengthen the body for mountain biking. Rather than writing an entire e-book on the subject, I’ll simply leave you with the names of a few more to take a look at. Try to stick to at least a 1:1 ratio of pulling to pushing movements to prevent new front to back imbalances from occurring.
Pulling exercises:
- Kettlebell swing
- Chin up
- 1-arm row (kettlebell, dumbbell, cable, or landmine)
- Face pull
- Farmer’s walk
Pushing exercises:
- Dumbbell bench press
- Dips
- Standing dumbbell shoulder press
- Lateral raise
- Weighted pushups
Legs:
- Swiss ball hamstring curl
- Hip thrust
- Side lunge
- Step-ups
- Donkey kick & fire hydrants
- Hip bridges
- Fire hydrants
As with the exercises covered in detail, you’ll notice that I never suggested ultra-low rep ranges. That’s because I want you to focus on good technique and building muscle in these areas to correct imbalances. Medium rep ranges tend to do the best job of meeting both of these needs.
Winter cardio for training
Just because the trails are frozen over doesn’t mean that you can’t continue to hone your craft. In addition to maintaining your cardio levels, the offseason is a great time to focus on pedal technique and efficiency.
Getting a bike trainer or set or rollers to practice perfecting your pedal technique can pay massive dividends once springtime rolls around. While riding inside certainly lacks the thrill of the outdoors, it can be incredibly convenient for putting in a good hard workout.
No commute to the trail or having to check the weather. Just toss on some headphones, and crank up the volume and the intensity.
Instead of plain steady-state riding, try mixing things up to keep it more interesting. Try alternating your workouts with speed intervals, climbing bursts, and ladder intervals.
If you need a break from the trainer, try out other forms of cardio. In particular, swimming is fantastic because it challenges both the lungs and muscles in new ways. Many people find swimming to be very therapeutic for the body as well.
The rower, treadmill, ski erg, and airdyne bike all offer fantastic opportunities to develop your cardio. If you still don’t find any of those interesting, try joining a pickup basketball league as a fun way to sneak in your cardio.
Mountain biking recovery
While weight training forms the fundamental basis for all training, it alone is not enough. Taking proactive measures to help your body recover will help you heal and prevent injuries, as well as speed up the process for correcting imbalances.
Recovery comes in many forms.
The most important thing is putting in a little bit of time on a consistent basis to help the body recover. Rome wasn’t built in a day, and your body certainly won’t heal in one day either!
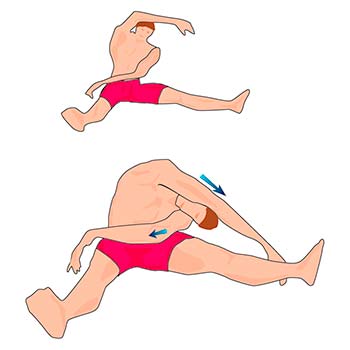
Mountain bike specific stretching
Knowing the primary muscle groups used in mountain biking makes picking the right exercises pretty easy! The quads, hamstrings, glutes, calves, forearms, and shoulders will need the most attention.
I’ll cover an example of some of the most generally helpful exercises below. However, every person will have their own uniquely tight areas so don’t be afraid to address other muscle groups on your own. Dropping in at a local yoga studio is another great way to ensure that you spend ample time addressing your mobility issues.
For each of the stretches shown, aim to hold it for 20-30 seconds and repeat 2-3 times. If an area feels particularly tight, don’t be afraid to accumulate more time there with a few extra sets.


Additional recovery techniques
While stretching is excellent for elongating tight muscles, it doesn’t address the sliding surfaces of the tissues. Although you can’t always see it, the muscles inside your body are moving past each other during movement. When these sliding surfaces get tacked down, it impedes our ability to move well.
To address this issue, you can use techniques like foam rolling or trigger point therapy. While trigger point makes it own special therapy tools, I find that a regular lacrosse ball is perfect for addressing most issues.
Foam rolling
If you’ve never seen it before, foam rolling is a pretty intuitive process. Start by picking an affected area to work on. We can use quads as an example.
Position your body across the foam roller so that your quad muscle is perpendicular to the roller. While you can certainly roll out the muscle in the direction of the fibers, it’s more effective to roll across them.
Start with the roller up by your hip, then slowly rotate your body. Work from the outside of your hip toward the groin. Once you have rotated as far as you can go, slowly work back to the beginning point. Use your hands or elbows to control how much pressure is being placed.
Once you’ve hit that same line on the quad, move down so that the roller is 1 inch closer to your knee. Repeat the same process until reaching the knee.
As you’ll soon find out, this process can eat up a lot of time! I often do my foam rolling while watching TV with the family. Instead of trying to jump around and hit everything in one session, work on a focused area and really try to loosen things up.
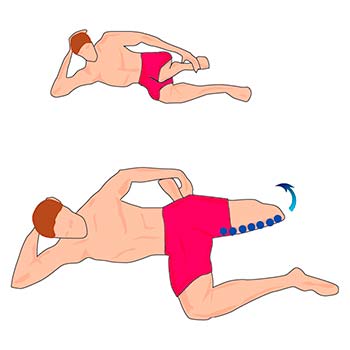
Trigger point therapy
Certain areas will be tough to get with the foam roller, so this is where I use the lacrosse ball. You can use it in a variety of ways to tackle the area that’s bothering you.
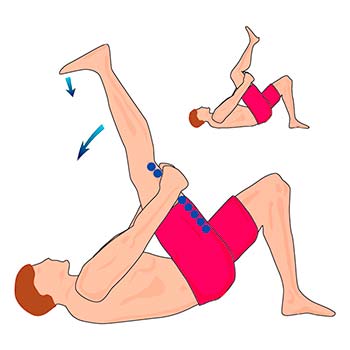
For example, if your glutes felt really tight and foam rolling wasn’t helping you could try putting your legs into a figure 4, then placing the lacrosse ball under your glute. This will create a very acute pressure, so you’ll want to use your hands to help control it.
Slowly roll around trying to hit all corners of the glute. If you find knots that won’t go away, try staying in place on top of them. Breathe in and out slowly and deeply, and you should find that it loosens up after 10-15 seconds. If it doesn’t, you can try contracting and relaxing the glute while the ball is pinned underneath it.
Professional massage
Last but not least, don’t be afraid to schedule yourself a massage. While Swedish massages can be very relaxing, you’ll probably get more benefit out of a sports or deep tissue massage. With these styles, the massage therapists are actively trying to correct muscle tightness rather than just provide a relaxing experience for you.
If you already know which areas need more work, tell your therapist before the session starts so that they can focus more time there. While they are more expensive, I find 60 – 90 minute sessions to be the most effective. It allows the therapist to be extremely thorough in their massage and not have to rush.
Last but not least, don’t forget that you can still ride as well! For tips on riding in the snow, make sure to take a look at my article here.