
When I first got into mountain biking, the more time I spent on the trail the more my wrists hurt. Now in fairness, I did break both wrists back in high school so it wasn’t like they were always pain-free to begin with.
But it made me wonder, is this something that I’m just going to have to deal with or is there something that I can do to ease the wrist pain from mountain biking?
Most wrist pain in mountain biking is a result of bad posture or poor bike setup. Focus on keeping your wrists in a neutral position, shifting your weight off your hands and onto your pedals, and avoid gripping the handles too tightly. Double check that the bike is properly set up for you.
Barring crash-related injuries, poor bike setup and bad posture are the most common sources of wrist pain in mountain biking. However, there are also medical cases like cyclist’s palsy and carpal tunnel syndrome that can also result in wrist pain.

The most common sources of wrist pain in mountain biking
Wrist pain from mountain biking source #1 – Bad posture
I have good news for you. One of the most common reasons for wrist pain and hand numbness during mountain biking costs you nothing to fix! Just like your grandmother always tried to warn you about, good posture is important.
By keeping your wrist in a neutral position on the handlebars you allow the load to be supported by the bones of the wrist and arm. The wrist is made up of eight small bones (carpal bones), plus the radius and ulna bones of the forearm. A neutral wrist position allows these bones to nicely stack, and create a smooth transfer of force when you lean into the handlebars.
By comparison, a wrist position that is heavily bent requires the surrounding tendons and ligaments to carry the load instead of the bony structures.
While this might not cause pain for a short period of time, the accumulated wear and tear from long rides or high riding frequency can take a toll and lead to issues like cyclist’s palsy, carpal tunnel, or tendinitis.
In addition to properly aligning your wrist, avoid shifting too much of your weight into your hands. Focus on shifting your weight back for a more even distribution, or allow your legs to carry more of the weight. Believe me, they’re much larger and certainly up to the task! Make “heavy feet, light hands” your mantra going forward.
Last but not least, try not to apply a death grip to your handlebars. While the adrenaline’s pumping on a descent it can be easy to over-grip without realizing it. Try to relax your hands and arms as much as possible without losing your grip.
Wrist pain from mountain biking source #2 – Poor bike setup
Assuming you’ve cleaned up all of the postural items, the next most common culprit is a poor cockpit configuration.
Handlebar setup
Handlebars that are too far from your seat can cause overreaching, and too much load placed on the hands. Whereas a seat that is too close to the handlebars can lead to awkward wrist positions that prevent you from reaching a more comfortable neutral one.
Check the sweep of the handlebars as well to ensure that they’re angled appropriately to allow for a comfortable wrist position. Look to find a position that causes equal pressure on the inside and outside of your palms.
If you feel more pressure on the outside of your hand, it means they’re too far forward. More pressure on the inside of the hand means they’re too far back.
Similarly, too high of a saddle or handlebars that are set too low can also create this forward shift of weight.
Stem length and angle
While focusing on the handlebars, another key component that can’t be ignored is your stem length and angle. While a long stem can be fantastic for climbing, it may not be the best fit for your type of riding. A shorter stem may be a better fit to ensure that you’re not placing your weight too far forward.
While a long stem can be fantastic for climbing, it may not be the best fit for your type of riding. A shorter stem may be a better option to ensure that you’re not placing your weight too far forward. Most riders find that a 50 – 80 mm stem length is ideal.
Double-check that your stem forms a 90-degree angle with the wheel. If you spent time adjusting your handlebar height, it may have been locked back in slightly off-center. A slight angle in either direction could create a lateral strain on the wrists.
For more details about stem length, make sure to take a look at my article here that also explains how their length affects bike handling.
Brake levers
Once your handlebars are properly configured make sure to take a look at your brake levers. They should be placed at an appropriate width to allow for easy access. Avoid angling them too far up or down.
Once again, we want to ensure that reaching for and using brakes doesn’t place the wrist in a poor position.
While these may seem like small tweaks they can make a massive difference. If you’re not able to nail down the fit on your own, work with your local bike shop to help get it fine-tuned until it’s perfect.
Wrist pain from mountain biking source #3 – New rider adaptation period
Love it or not there is absolutely an adaption period when first getting into the sport of mountain biking. Just like jumping into any new sport, your body will need time to adapt to being used in new ways.
These minor aches and pains should not last long but are a good reminder to focus on proper form and technique to prevent issues from arising down the road. Or trail in our case 😉
Wrist pain from mountain biking source #4 – Cyclist’s palsy
Cyclist’s palsy arises when the ulnar nerve becomes irritated and compressed. This is usually a result of long-distance riding or overuse. The ulnar nerve follows the ulna bone through the forearm, and threads through the carpal bones on the pinky finger side of the wrist.
Over time the vibrations and shock delivered to the wrist by the handlebars can cause the damage to the nerve due to compression. This compressive effect is magnified when the wrist is placed in an extended (bent back) position rather than being held neutral.
Some rider’s experiencing cyclist’s palsy experience pain, while others find issues with numbness or weakness.
In addition to proper wrist positioning, regular movement of the hands around the handlebars can help to alleviate pressure points on the nerve.
Wrist pain from mountain biking source #5 – Carpal tunnel syndrome
Unfortunately, it’s not just long hours on a computer that can cause carpal tunnel syndrome…so can mountain biking.
Similar to source #3, carpal tunnel results from too much pressure on a nerve in the wrist. In this case, it’s the median nerve being dealt the bad hand.
Similar to cyclist’s palsy it usually results in pain, numbness, or tingling in the hand and wrist. If you had carpal tunnel before getting into mountain biking then it’s something that you’ll want to keep a close eye on.
Additional ways to prevent wrist pain from mountain biking
As we’ve already covered, the most important things that you can do to prevent wrist pain from mountain biking are to develop good postural riding habits and get your bike properly set up. Once you’ve got those two in line you’re off to a fantastic, pain-free start.
However, there are also a few gear-related items that can help to spare your wrists.
Gear for wrist pain prevention
Depending on the size of your hands, you may want to consider replacing your grips with ones that fit your hands better. In particular, grips that are too small may lead to over-gripping.
Many grips also provide vibration dampening to help absorb some of the force being transferred from the handlebars.
In addition to enhancing your grip, mountain bike gloves can also be helpful for absorbing shock while riding. Many of the top models have padded gel palms to absorb force.
Training for wrist pain prevention
Along with gear, strength training is a fantastic way to prevent wrist pain. Strengthening the tissues around the wrist makes them more supportive and less likely to be injured.
As a medical disclaimer, I should point out that these exercises are intended for injury prevention, not treatment. Always consult with your physician for injury-specific treatment plans.
Bottoms-up kettlebell presses
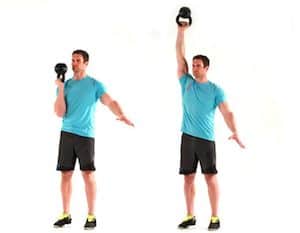
Bottoms-up presses with kettlebells are a fantastic way to isometrically strengthen the wrist. Grasp the kettlebell handle, and press it from your should to overhead with the kettlebell inverted. You’ll find that your wrist will have to work very hard to stabilize the weight during pressing.
The weight used here will be much lighter compared to what you would normally use for a shoulder press, but that’s ok since the purpose is to focus on strengthening the wrist. Use a weight that allows you to perform 3 sets of approximately 10 repetitions per arm.
Use a lighter weight if you’re not able to prevent it from flipping over during the course of a set.
Wrist flexion / extension exercises
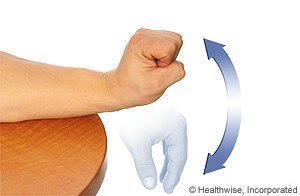
Because the forearm supports the wrist, it’s important to strengthen it in both flexion and extension. In the image above, the upward bend of the wrist shows extension while the downward bend depicts extension.
You can load this movement by holding a light dumbbell. Then slowly move your wrist work through a full range of motion from top to bottom. Because you’re resisting the force of gravity, you’ll need to flip your arm over to train the opposite action. Supporting the arm and a flat, hard surface is very helpful to prevent cheating.
This exercise does not allow for heavy loading, so focus on extremely light weights e.g. 1 pound and work your way up. Aim for 3 sets of 15 repetitions per arm in both flexion and extension.
Related Questions
- Can wing grips help with wrist pain? Wing grips encourage the use of bad wrist positioning and should not be used as a remedy for fixing wrist pain from mountain biking.
- How long does it take tendinitis to heal? Average cases of tendinitis can heal in 2 – 4 weeks. However, chronic cases can take 6 or more weeks to fully recover.
- Should your arms be locked during riding? No, it’s best to keep your elbows bent while riding to help absorb the force of bumps and vibrations.